Our experience setting up Galaxy Pro for I ❤ Meteor
This is a guest post that originally appeared on The Meteor Chef, a community-maintained resource for Meteor documentation and education.
When we at The Meteor Chef last checked in our site I ❤ Meteor, we’d successfully deployed the application to Meteor’s Galaxy Hosting Service and rigged up DNS so users could access the app. Since then, the folks behind Galaxy at Meteor Development Group released an upgraded version of Galaxy — Galaxy Pro — that introduces some interesting features to further simplify the devops process.
Since we deployed, the performance of I ❤ Meteor has been a bit of a mystery. Save for general performance metrics in the Galaxy Dashboard (Active connections, CPU usage, and Memory usage) it’s been difficult to identify bottlenecks in the application and work toward improving performance. To help with this, Galaxy Pro has introduced a new feature — Meteor APM (application performance monitoring) — that gives insight into potential problem areas like:
- Publication and Subscription performance
- Meteor Method performance
- Live Query performance
- Client and Server error tracking
In this tutorial, we’ll take a look at how to configure and make use of Meteor APM, learning how to improve the overall performance of our application. We’ll learn how to enable performance monitoring as well as client-side error tracking to keep our eye on as much as possible.
In addition to improved performance tracking, Galaxy Pro also gives us access to IP Whitelisting: a means for getting the IP addresses that Galaxy makes requests from. We’ll see how to make use of this by setting up a staging database for I ❤ Meteor on the MongoDB Atlas service — a hosted MongoDB solution — which requires the IP addresses of the servers connecting to the its databases.
To get started, we’ll need to do some housekeeping to make sure our app plays nice with Galaxy Pro, and more specifically, Meteor APM. Let’s do it!
Prerequisites
Before we get started, make sure to complete the following steps. This will ensure that you have all of the code and dependencies you need to complete the tutorial. Because we already built I ❤ Meteor in another tutorial on deploying with Galaxy, we’ll use the code from there to save us some headaches. After you’ve cloned a copy of the app, make sure to install all of the dependencies in the next section.
git clone https://github.com/themeteorchef/deploying-with-meteor-galaxy.git && cd deploying-with-meteor-galaxy && npm install
If you’d rather just see the changes made for this tutorial, you can download the repo for this tutorial separately:
git clone https://github.com/themeteorchef/enhanced-deployments-with-galaxy-pro.git && cd enhanced-deployments-with-galaxy-pro && npm install
Keep in mind: if you download this second repo, you will already have the necessary packages and code installed and can skip to the “Upgrading to Galaxy Pro” section below.
Preparing for Galaxy Pro
Before we dig into upgrading I ❤ Meteor’s deployment to Galaxy Pro, we need to make a few minor tweaks to our application locally. First, it’s important to note that Galaxy’s Meteor APM offering is a rebranded version of another service, Kadira, which was purchased by the Meteor Development Group in March, 2017.
First: remove any Kadira packages
Kadira was fairly popular in the Meteor community and had its own set of packages for enabling application performance monitoring. If you were a Kadira customer in the past, before you add the packages below you’ll want to remove any Kadira-related packages. Specifically, you’ll want to remove the meteorhacks:kadira with meteor remove meteorhacks:kadira.
Requirements for Meteor APM
With any Kadira-related packages uninstalled, next, we need to add support for two packages that will enable support for Meteor APM:
meteor add mdg:meteor-apm-agent
This package will enable support for Publication and Subscription monitoring, Meteor Method monitoring, and Live Query monitoring.
meteor add meteorhacks:zones
This package will give Meteor APM better access to client-side errors. This is important because we want to be able to see when something goes wrong in one of our user’s browsers (the client).
With these installed, we’re all set to start monitoring the performance of our application and find any performance holes we need to plug. Before we do, though, we need to upgrade our application to Galaxy Pro.
Upgrading to Galaxy Pro
Coming up, we’re going to make a few changes to our application in order to test out some of Galaxy Pro’s features. Before we do, though, we need to make sure that we’ve upgraded our containers on Galaxy to Galaxy Pro. Good news: it’s super easy.
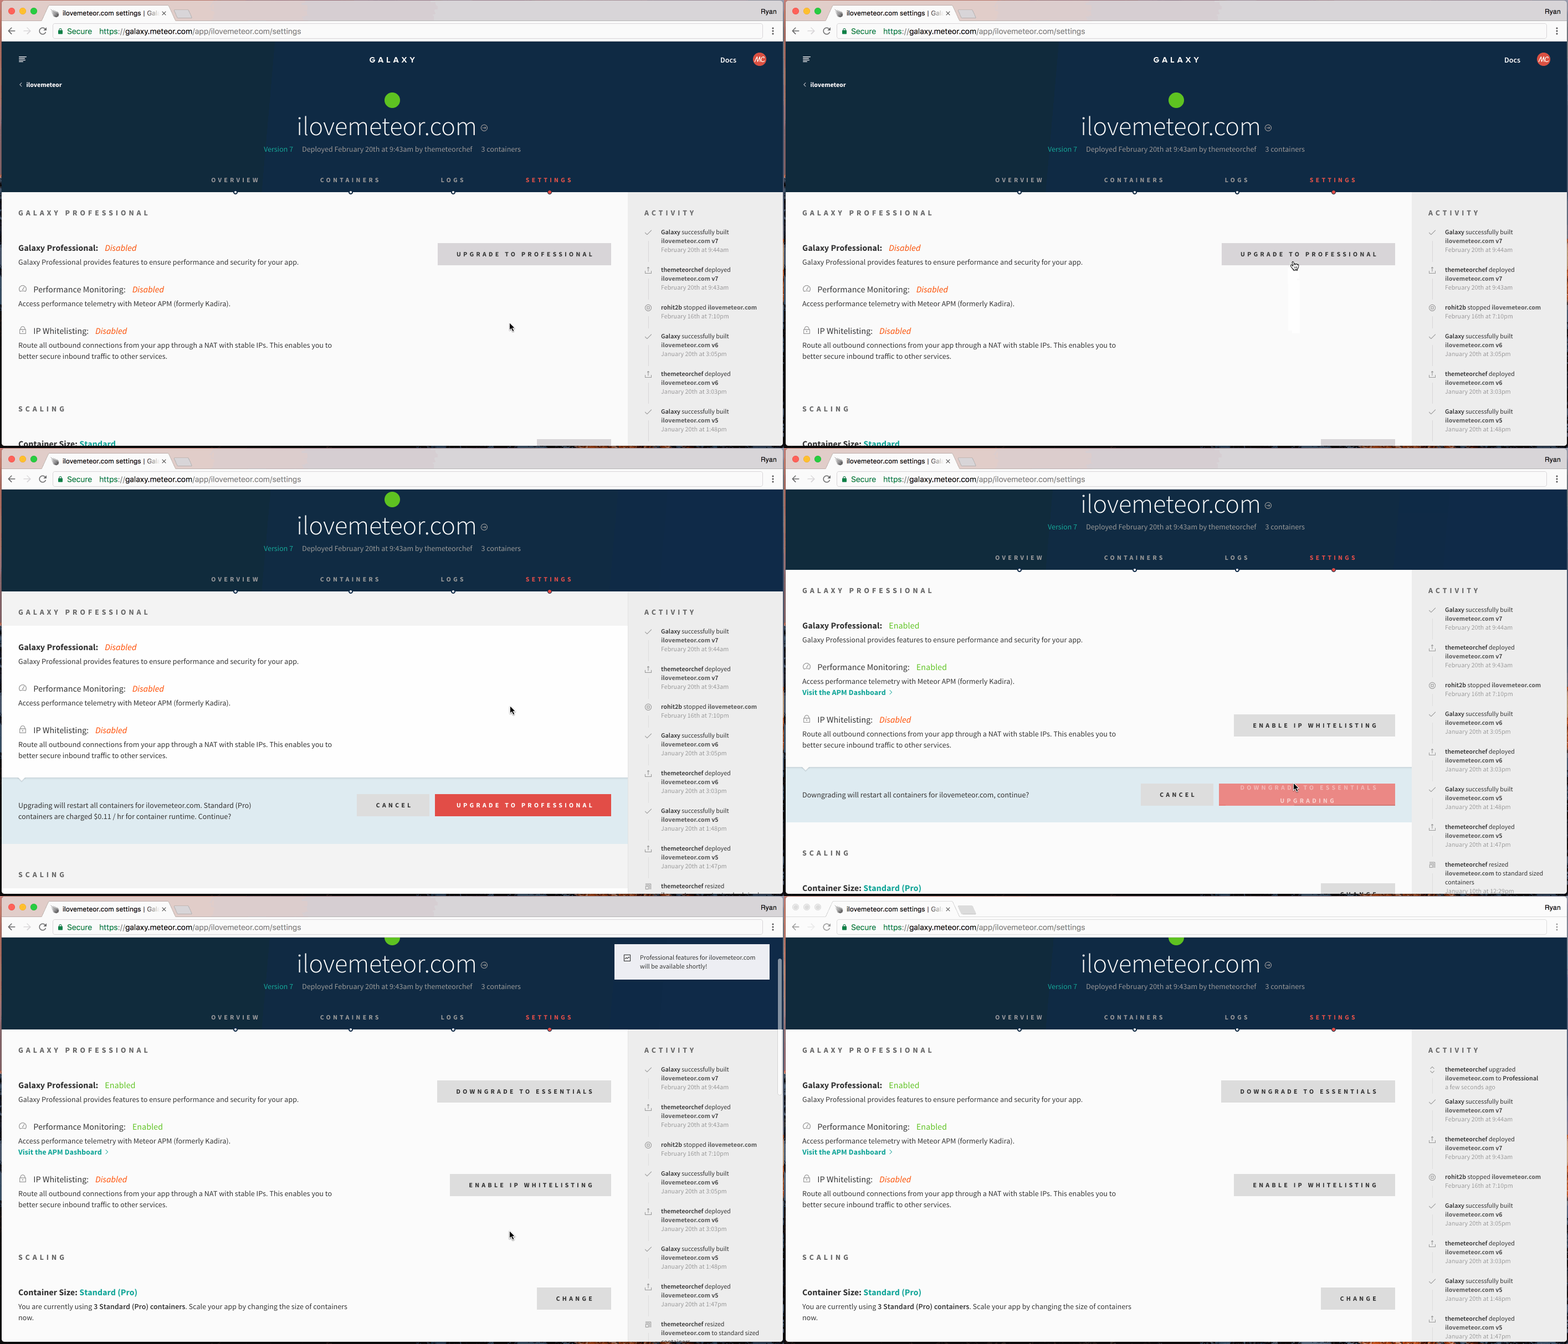
Assuming you’ve already deployed your app to Galaxy (if you haven’t make sure to give our deployment tutorial a read), click on the domain for the application you’d like to upgrade and head to the “Settings” tab. From there, at the top of the page you’ll see a button “Upgrade to Professional” that will delete your application and send you a bill for $1,000,000 USD, via fax.

Poor jokes aside, no, this will prompt you with a confirmation to upgrade your existing containers to Galaxy Professional (fair warning: this will increase the price per hour on your containers slightly — with charges increased from your container tier’s base price). Once complete, you’ll see some new options and information appear in the same space.
Make sure to deploy after installing packages and upgrading
In order to get access to the features we’ll demonstrate below, it’s important to deploy your application after adding the packages we’ve outlined above. Without them, Meteor APM will not be able to read any data from your application.
To demystify the service a bit, we’ll spend the rest of the tutorial walking you through how Galaxy Professional can help to improve the performance and extensibility of your Meteor application.
Adding images and monitoring performance with APM
While version 1 of I ❤ Meteor was neat, something we’ve been missing is images to help projects stand out. Now, we’re going to add support for attaching an image when submitting a project which, conveniently, will require a remote API call to Amazon S3 to store the image. This is great because it will help us to understand how to use Galaxy’s new APM feature and figure out how to speed things up for users.
While we’re not going to a deep dive on how to implement image uploading (give our uploading files with Amazon S3 tutorial a read if you’re curious), we do want to call attention to how we’re ultimately passing images to Amazon S3 on the server. After the file is read on the client, we pass the details of the file (including its raw data) up to a method which then passes the file along to Amazon S3 for storage. While we expect our writes to be fairly speedy, there’s no guarantee.
Our call to S3 (in our /imports/api/projects/server/methods.js) looks like this:
export const submitProject = new ValidatedMethod({
  name: ‘projects.submit’,
  validate: new SimpleSchema({
  title: { type: String },
  url: { type: String },
  createdBy: { type: String },
  image: { type: Object, blackbox: true },
  }).validator(),
  run(project) {
   const projectToInsert = project;
   projectToInsert.owner = this.userId;
   return s3.putObject(project.image)
   .then((image) => {
     if (image) projectToInsert.image = image;
     return Projects.insert(projectToInsert);
   })
   .catch((error) => {
     throw new Meteor.Error(‘500’, `${error}`);
   });
  },
});
Inside of our projects.submit method, we make a call to a module method s3.putObject to actually fire the upload. Notice that we do this before we insert a project into the database, meaning, we need to wait for a URL back from S3 before the project is created in our database.
Measuring performance
To get a feel for how our method performs, if we hop over to Meteor APM, we can see the general response time:
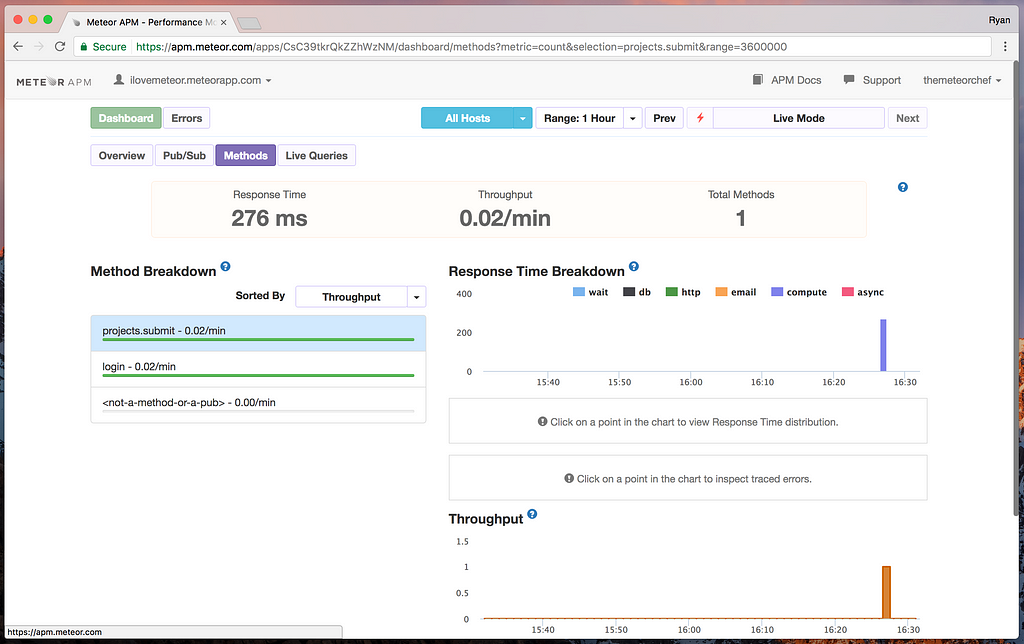
In the Meteor APM dashboard, if we flip over to the “Methods” tab and click on the projects.submit method, we can see that the response time was 276ms (milliseconds). This means that from the time we clicked the submit button, it took 276ms for our method to send back a response. Generally speaking, that’s not bad for a remote call, but we can do better.
We want to pay attention to is how Meteor APM is helping us. Without this information, we’d be more-or-less guessing on the performance of our method call. With APM, we’re getting real and live data about the performance of our application, allowing us to make quick fixes and deliver a better experience to customers.
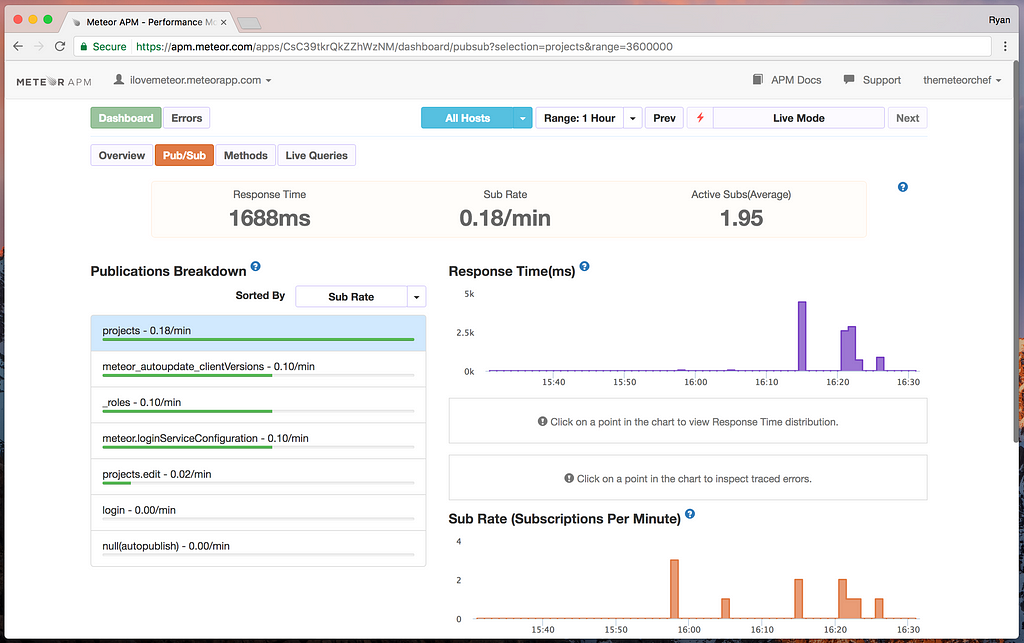
Switching over to the “Pub/Sub” tab and clicking on our projects publication, we can see that its performance is pretty terrible. The 1688ms “Response Time” listed here means that from the time the client connected to the app, it took nearly two seconds to receive a response from the server for just this one subscription.
In our /imports/api/projects/server/publications.js:
Meteor.publish(‘projects’, function projectsPublication(query, projection, paginationLimit) {
  check(query, Object);
  check(projection, Object);
  check(paginationLimit, Number);

  const queryToAssign = query;
  const projectionToAssign = projection;

  const isFavorites = queryToAssign[‘favoritedBy.userId’];
  const isSubmissions = queryToAssign.owner;

  if (isFavorites) queryToAssign[‘favoritedBy.userId’] = this.userId;
  if (isSubmissions) queryToAssign.owner = this.userId;

  // projectionToAssign.limit = paginationLimit;
  return Projects.find(queryToAssign, projectionToAssign);
});
Why is that number so high?
Well, technically, on the client I ❤ Meteor is set up with infinite scrolling pagination, meaning, we limit the number of posts on screen to 24 projects on first load. In the code above, we’ve commented out this limit, meaning all projects are published to the client at once. For our example “Response Time,” we loaded up our database with 1000+ documents. Translation? Without a limit our publication is sending 1000+ documents to each client as soon as they connect.
You may be thinking “Jeeze, two seconds is pretty good…isn’t it?” If we only had one user? Sure, not terrible. However, this is the response time for a single connected client, meaning, for each user that connects, they’re all receiving this response time. The punchline is that the response time is high because we’re sending too much data on load (the user obviously cannot see all 1000 projects at once) and our server is having to process each of those requests, leading to an unnecessary waste of server resources.
Again, good-guy APM is letting you know who’s got their hand in the cookie jar so we can correct it. In case the correction isn’t clear, we just need to uncomment our limit in our publication on the server so that it properly kinks the hose, only letting out a few projects at a time. That sounds suggestive. It isn’t.
Improving performance
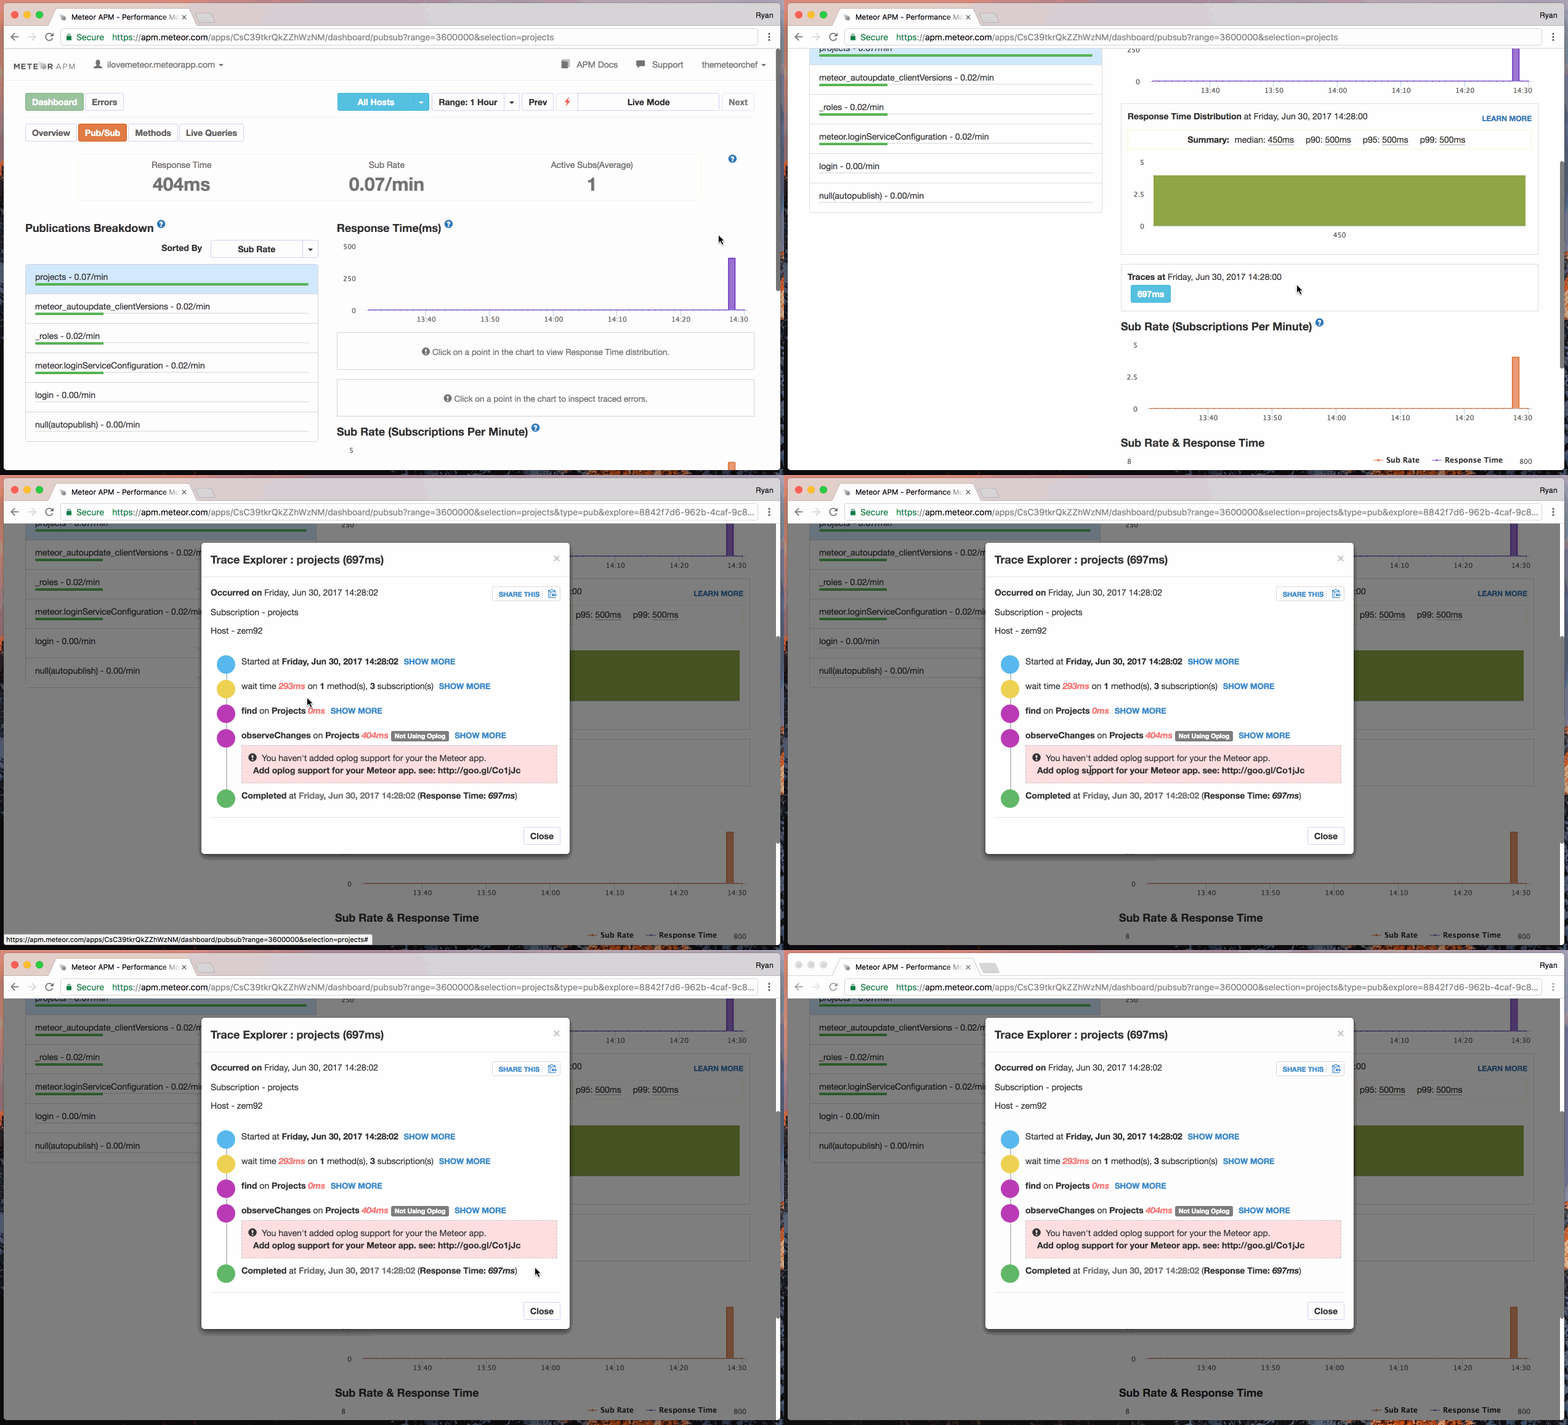
Updating our publication code to include our limit again, if we redeploy, we can see a significant improvement in response time, down to 404ms. This is much better, however, we can improve it further. While the “Response Time” here is helpful, Meteor APM can help us dig in even further and see more information about the stack trace of our request (literally, the timeline of operations between opening the connecting and getting a response).
In the GIF above, if we look at the stack trace for our projects publication — accessible by clicking on a point in the “Response Time (ms)” chart and scrolling down to click on the blue button under “Traces at” — we can see a blip in our stack trace. Here, our response time seems to be slowing down because we haven’t enabled MongoDB oplog support.
If we follow the breadcrumb trail laid by Meteor APM and add support for MongoDB oplog tailing to our application, we can see our application’s performance improve on our next deployment:
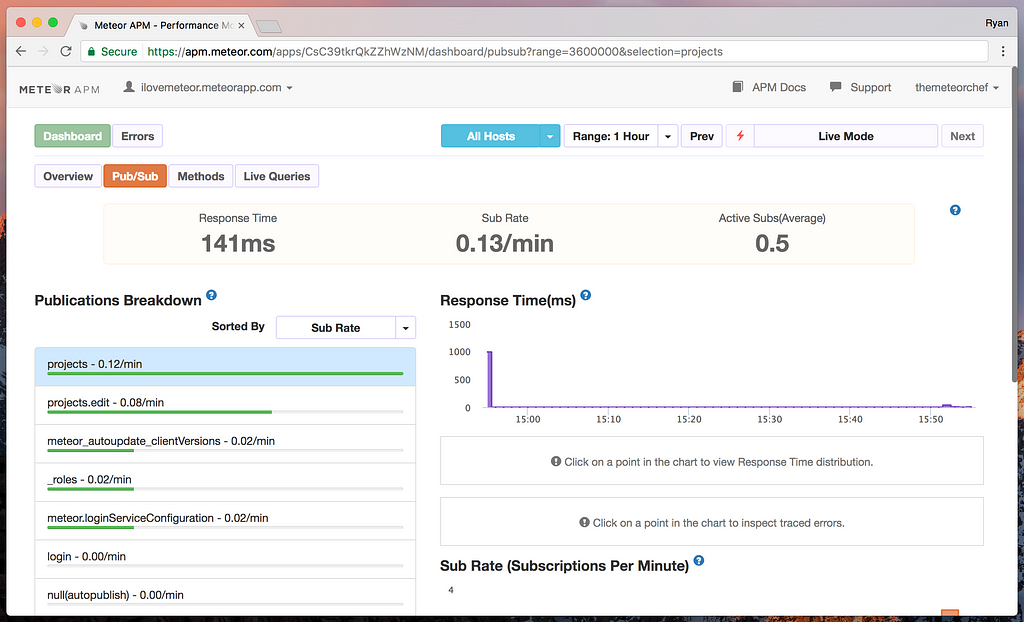
Well dang, Meteor APM, you just earned your keep fast. With just two changes that would have otherwise been next-to-invisible, we dropped our pub/sub response time down from 1688ms to 141ms, gaining our users back 1.5 seconds of their lives. Impressive, right? What if we apply this same process to our methods? Making a quick modification to our method code in /imports/api/projects/server/methods.js:
export const submitProject = new ValidatedMethod({
  name: ‘projects.submit’,
  validate: new SimpleSchema({
    title: { type: String },
    url: { type: String },
    createdBy: { type: String },
    image: { type: Object, blackbox: true, optional: true },
  }).validator(),
  run(project) {
    const projectToInsert = project;
    projectToInsert.owner = this.userId;
    const imageToInsert = projectToInsert.image;
    delete projectToInsert.image;

    const projectId = Projects.insert(projectToInsert);

    s3.putObject(imageToInsert)
    .then((image) => {
      if (image) Projects.update(projectId, { $set: { image } });
    })
    .catch((error) => {
      throw new Meteor.Error(‘500’, `${error}`);
    });

    return projectId;
  },
});
Where above our new project creation was dependent on receiving a URL back from Amazon S3 first, here, we’ve refactored our code to not do this. Instead, we create our project first and then attempt to store our image on Amazon S3. On the client, we have a placeholder image loaded until we get a response back from S3. Once we do, we go ahead and update the project we just inserted into the Projects collection. With this, we skip an unnecessary wait on Amazon S3 and can respond to the user much quicker.
If we deploy this change to Galaxy and look at our Method response time…
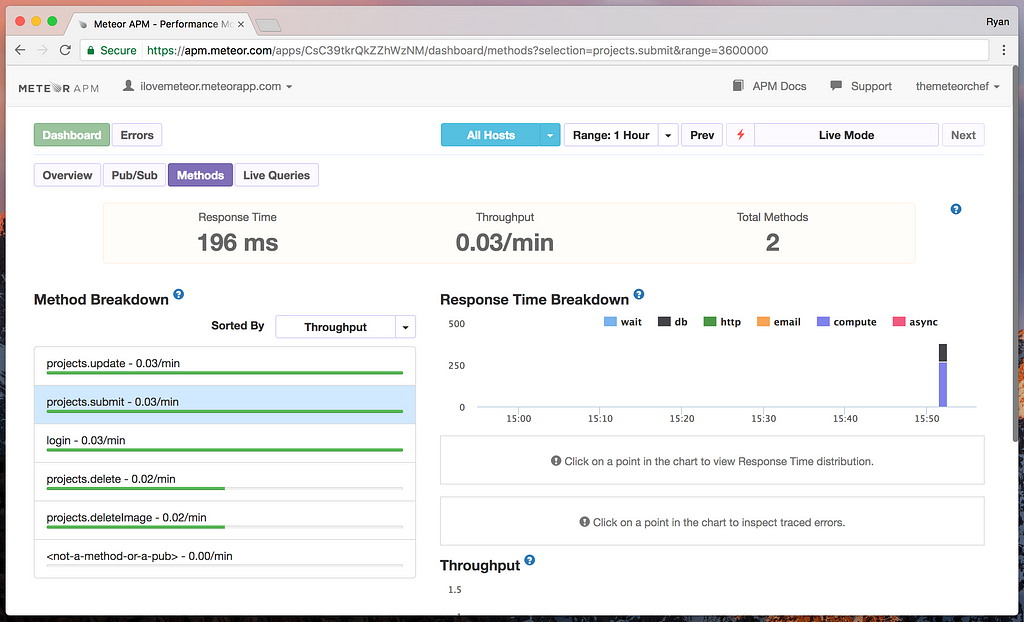
Put some relish on that hot dog: it’s eatin’ time! Wait…what? Ignoring that, though not as dramatic, we’ve managed to decrease our projects.submit method’s response time by 80ms. While this may seem trivial, when it comes to application performance an “every penny counts” attitude is key. Any time we can save our users means happier customers and a lighter load on our servers. Win!
Watching for and correcting client-side errors
Galaxy APM makes this almost a little…too easy. Regardless, we should take a look as there are a few discrete steps.
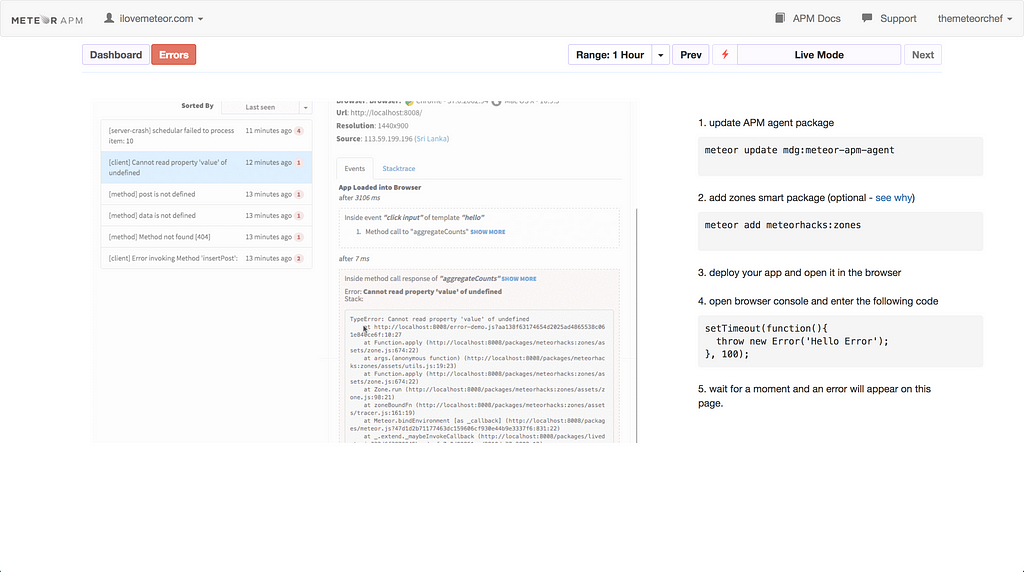
First and foremost, we need to make sure that we’ve enabled support for client-side error tracking by installing the meteorhacks:zones package. In case you’re wondering, yes, this package was originally offered by the folks at Kadira but is now maintained by the Meteor Development Group (translation: safe as spaghetti sauce). From your project, in the terminal:
meteor add meteorhacks:zones
Once this is installed, make sure to deploy your application to Galaxy as any client-side errors in your development environment will not be tracked. Once your application is deployed, head over to the “Errors” tab in Meteor APM (visible in the top-left of the dashboard beneath the “Meteor APM” logo). If any client errors occur on any connected client, they will now appear here.
As an example, if we connect to our deployed application (e.g., https://www.ilovemeteor.com) in the browser console we can run:
setTimeout(() => { throw new Error(‘These pretzels are making me thirsty!’); }, 100);After a few seconds — potentially a bit longer if there are clouds over San Francisco — we should see our error pop up in Meteor APM:
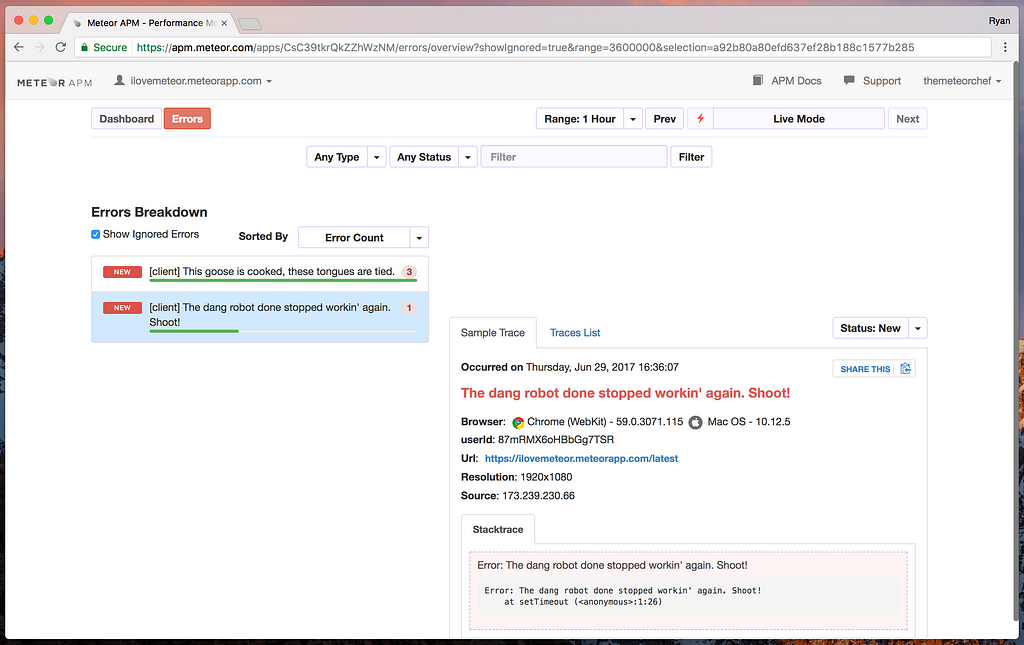
Pretty neat, right? Not only do we see the errors that were thrown, but we get access to the user’s browser information, the exact date and time the error occurred, the URL they were on when the error occurred, and a full stack trace. Having this information means solving client-side errors much faster, avoiding the whack-a-mole “works on my machine” strategy for bug fixes.
Looking for more?
While we’ve covered the basics of working with Meteor APM, we highly recommend reading the Getting Started with APM guide to get a detailed look at the APM dashboard and all of the features it includes.
With this in place, next, let’s take a look at Galaxy Pro’s IP whitelisting feature to see how we can connect our app to third-party services securely.
Enabling and using IP whitelisting
As part of our upgrade, one thing I ❤ Meteor has been missing is a staging server. While the app’s production database is hosted on mLab, for staging, we want to test out hosting our database on the MongoDB Atlas service. In order to connect to any databases we create on Atlas, we’re required to list the IP addresses of any servers connecting to the database. Fortunately, with Galaxy Pro we can get access to this information and set up our connection without a lot of fuss.
Getting access to Galaxy’s IP addresses
You may be thinking “I already know how to do this” if you were paying attention earlier when we upgraded I ❤ Meteor’s containers to the “Professional” level on Galaxy. If not, what we need to do is head back to Galaxy dashboard and access the “Settings” tab for our app.
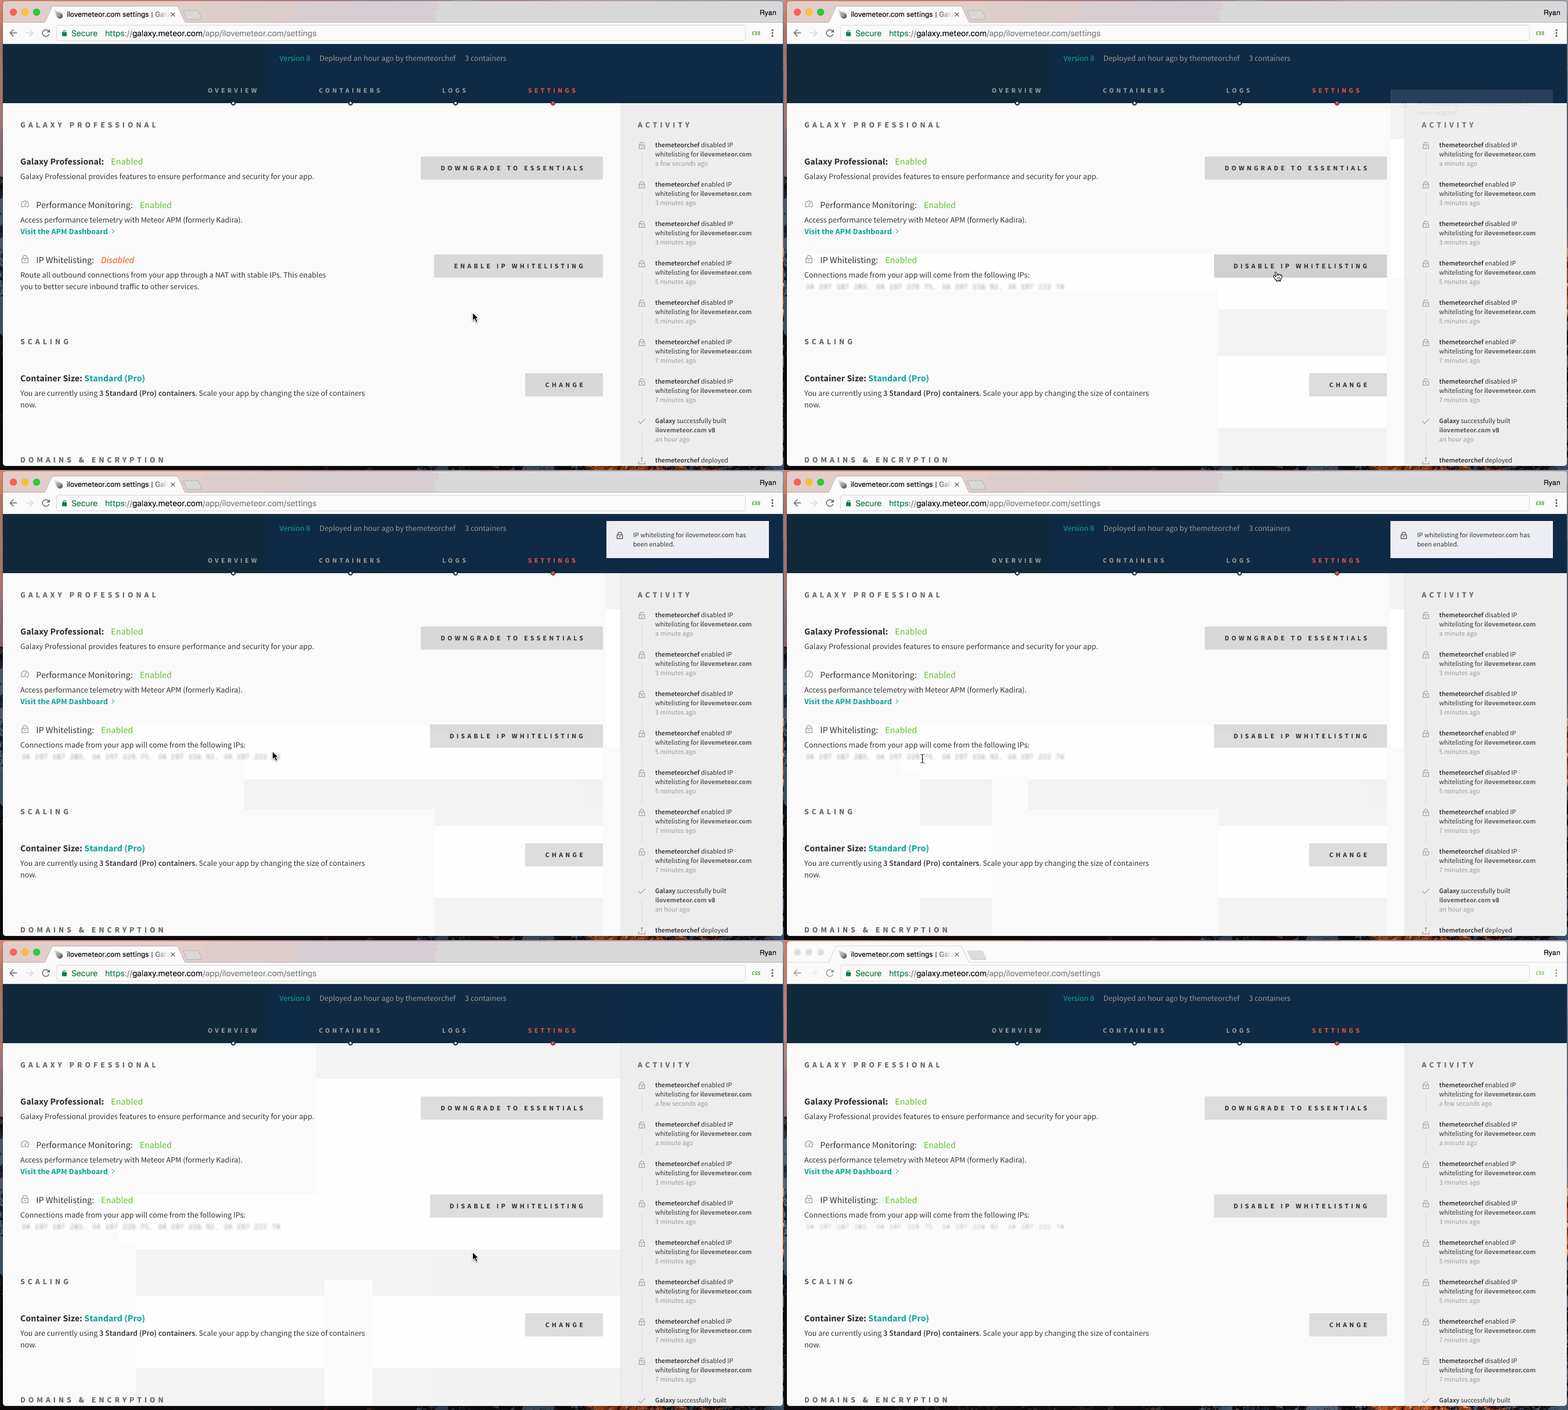
Up toward the top under the now-visible “Galaxy Professional” block, we want to click the “Enable IP Whitelisting” button. When we do, we’ll automatically see a list of IP addresses mapping to our containers appear over on the left in green (and see the “IP Whitelisting” header show “Enabled” instead of “Disabled”). That’s it! Now we have access to the IP addresses for our container.
To make sure usage is clear, let’s jump over to the MongoDB Atlas service where our database will be hosted and see how to put these addresses to use.
Making use of our Galaxy IP addresses
We’re going to skip ahead a bit in the process now and assume you’ve already signed up for a MongoDB Atlas account here. Once you’ve signed up and created your first cluster, you should be logged in and see a message about your cluster being deployed:
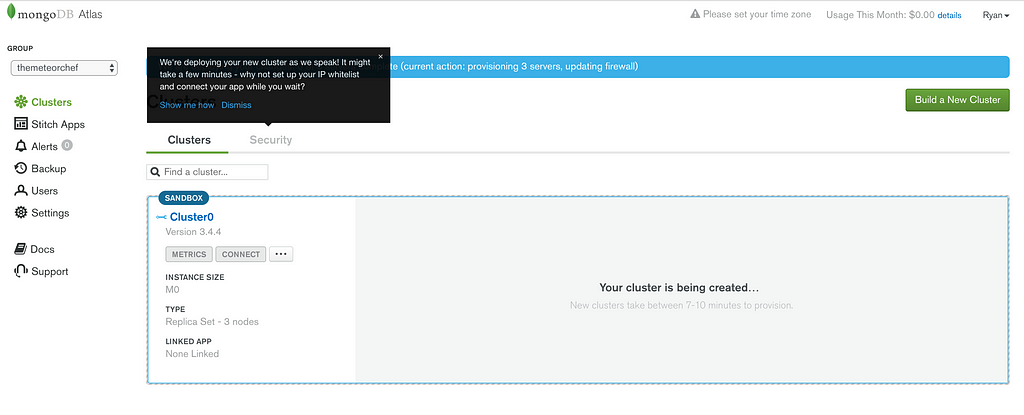
Inside of that message, we can see a suggestion to set up IP Whitelisting for our app under the “Security” tab in our dashboard. If we jump over there, we can click on the green “Add IP Address” button to reveal a modal to enter our IP addresses.
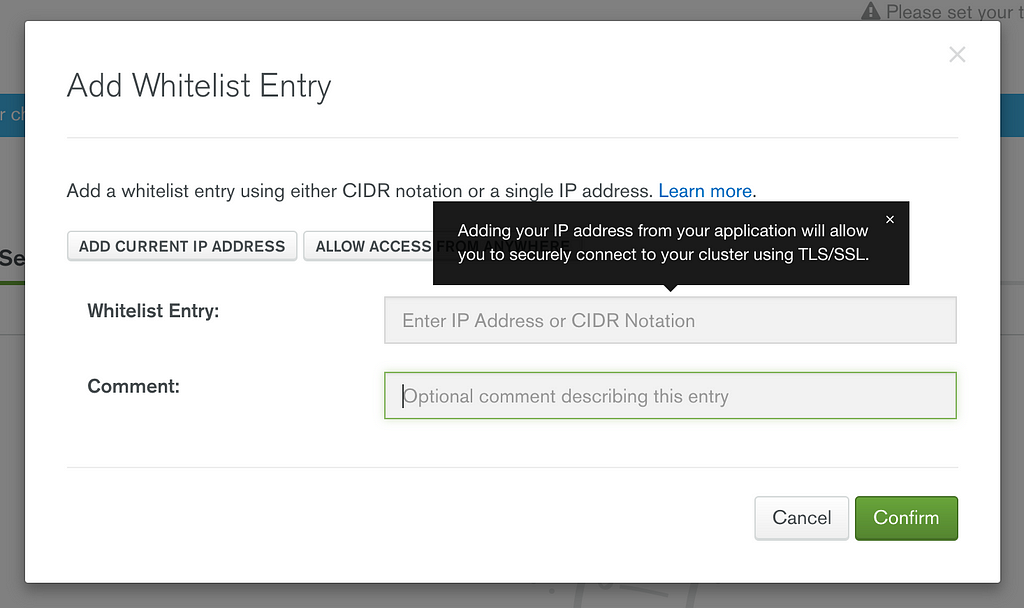
As the helper text suggests, this will allow us to securely connect to our database on MongoDB Atlas without any issues. Optionally, we can set a comment (a wise choice) to let us know who issues this IP address. For convention sake, something like Meteor Galaxy #1 (up through #4 for each IP address) should do the trick.
Once we’ve added each of these, we’re all set! If we boot up our production app, we should have access to our database on MongoDB Atlas without any issues. If you’re feeling curious, try removing these IPs to see how the connection fails. Destruction!
Wrapping up
Well, that about does it for now! I ❤ Meteor is up and running on Galaxy Pro, we’ve configured our app for performance monitoring and error tracking, and we even connected our staging server to a database using IP whitelisting. From here, it’s up to us to keep a watchful eye on performance and errors.
If we run into any snags, though, Galaxy Pro offers prioritized support, meaning any support requests are bumped up in Galaxy’s support queue for faster service! Nice.
Pretty good. Pretty, pretty, pretty, pretty good.
Takeaways
- Galaxy Pro gives us access to a great set of tools for monitoring application performance and behavior with Meteor APM.
- If our application uses third-party services that require access to our server’s IP addresses, Galaxy Pro’s IP whitelisting is a must-have.
- Overall, Galaxy Pro is pretty dang easy to set up. Just a few packages and a few clicks to improve our devops setup.
Improving App Performance with Meteor APM and Galaxy Pro was originally published in Meteor Blog on Medium, where people are continuing the conversation by highlighting and responding to this story.