Quantcast
Channel: Meteor Blog - Medium
Viewing all 160 articles
Browse latest View live

Announcing Meteor 1.5

$
0
0

Dynamic import(…), exact code splitting, immutable module caching, and bundle analysis tools

Today we’re thrilled to announce the release of Meteor 1.5, which has been more than four months in the making, with significant improvements around JavaScript bundle sizes and page load performance.

How to upgrade

To update any existing application to Meteor 1.5, simply run meteor update in the application directory. To install Meteor from scratch, consult the installation instructions on our website.

As a reminder, make sure your application’s .meteor directory is committed to your version-control system (e.g. Git, Subversion, etc.) so it’s easy to roll back if you encounter problems during any upgrade.

A little Meteor history

When Meteor was first released in late 2011, most websites were still submitting forms and reloading themselves to display changes. Using the recently-standardized XMLHttpRequest API to fetch dynamic content was all the rage, and jQuery was hugely popular. At the time, I was working for Quora, whose live-updating questions and answers, real-time notifications, and hyperactive news feed felt like a significant competitive advantage.

In that context, Meteor’s vision was revolutionary: What if your data could be refreshed automatically whenever anyone changed it, and the user interface of your application would update accordingly? What if you sent only data over the network, and let the client render it? What if reactivity was the default, not an occasional trick? What if you didn’t have to be Quora, or Asana, or even hire a team of engineers, to build an app like that? What if it was all open source?

In order to implement that vision, Meteor made bold, opinionated tradeoffs. Every Meteor application would send and receive its data over a WebSocket, at a time when native WebSocket support was far from universal. We embraced MongoDB because it provided a real-time log of changes that could power our data system. We added low-level support for coroutines (fibers) to Node in hopes of simplifying our asynchronous APIs, before the Promise abstraction was standardized. We built our own packaging system before npm became the way everyone shares their JavaScript code.

At the time, those tradeoffs were right for many of our developers. As time has passed, however, new technologies and best practices have emerged from the wider ecosystem, creating opportunities to revisit some of the choices we previously made. In many ways, that realignment has been the narrative behind every major Meteor release since I joined the company in September 2014.

What Meteor is (and isn’t)

In its essence, Meteor is a tool for building rich, client-side applications that remain up-to-date even as multiple clients interact with the application simultaneously.

Historically, this emphasis on long-running single-page applications has prevented Meteor from being a very good tool for building lightning-fast landing pages or web crawler-friendly static websites. Rather than optimizing for initial page load times, Meteor prioritizes the needs of users who load the application once and then interact with it for an extended period of time. Arguably, the initial JavaScript bundle can take more time to download if the code it contains enables near-instantaneous data updates, makes the application more predictable, and saves you from duplicating the work of other users because you didn’t see it soon enough.

Still, first impressions matter, and a large Meteor app can take quite a bit of time to load, especially over a slow network, if the initial JavaScript bundle is not already cached by the browser.

It’s time we revisited these particular tradeoffs, and Meteor 1.5 empowers developers to improve page load performance significantly, without compromising any of Meteor’s traditional strengths.

Code splitting

Meteor is hardly the first web framework to provide a means of “code splitting,” or delivering JavaScript on demand, in smaller fragments, rather than in one monolithic initial bundle.

My earliest experience with code splitting was in the summer of 2006, as an intern at Meebo, the web-based instant messaging startup. I vividly remember the full-time engineers attempting to use dojo.require and dojo.provide to defer fetching code that wasn’t necessary to display the buddy list. Ultimately, the performance benefits were not dramatic enough to justify maintaining the system, and the project was put on hold. Maybe they eventually got back to it, but my point is that code splitting is a notoriously tricky, relatively old idea, and by no means a silver bullet.

In the decade since then, JavaScript has changed in ways that make code splitting much, much easier. Our JavaScript engines are orders of magnitude faster, our browsers are smarter, we have a much better idea how modules ought to work, and just recently a new language feature was proposed—dynamic import(…)—that promises a standard way to request additional code from the server.

Meteor 1.5 contains many improvements, but the one that overshadows all the rest is a completely new implementation of the proposed dynamic import(…) syntax, backed by a sophisticated caching and module fetching system that makes the most of Meteor’s unique advantages.

Dynamic import(…) in Meteor

First and most importantly, Meteor’s implementation of dynamic import(…) requires no special configuration whatsoever. If you’ve used dynamic import(…) already in another framework, chances are it was based on the implementation in Webpack 2, perhaps hidden behind a layer of abstraction. If you dug into that abstraction, you would find a configuration surface area that—let’s just say—would make you appreciate the abstraction. To get a sense for what I’m talking about, see this in-depth discussion of how to optimize your code splitting in Webpack 2, which culminates in a 95-line, carefully considered configuration file that enables magic like the BundleAnalyzerPlugin and the CommonsChunkPlugin, neither of which is necessary nor makes any sense in Meteor.

In Meteor 1.5, if you wish to defer loading a JavaScript module (and all of its dependencies) until later, you simply turn

import { a, b as c } from "./some/module";
doSomething(a, c)

into

import("./some/module").then(({ a, b: c }) => {
doSomething(a, c);
});

This API should be familiar if you’ve used Promises before, because import(“./some/module”) returns a Promise for the exports of the requested module.

If you prefer, you even can await the result using an async function:

async start() {
const { a, b: c } = await import("./some/module");
return doSomething(a, c);
}

Either way, since you’re now using dynamic import(…) instead of a traditional import declaration or require call, ./some/module will be removed from your initial JavaScript bundle, along with any modules it depends on that would not otherwise be bundled. End of story.

Bundle analysis tools

If you care at all about your bundle size, then you must also care about measuring the impact of your improvements.

In tandem with Meteor 1.5, we’ve released a package called bundle-visualizer that can help you understand the breakdown of your Meteor packages and the JavaScript modules they contain, in proportion to the total size of your initial bundle.

To use this package, simply run

cd path/to/your/meteor/1.5/app
meteor add bundle-visualizer
meteor run --production

then open your app in a web browser. As you move your cursor over the sunburst chart, you can easily see which packages, directories, and modules are most responsible for the size of your bundle:
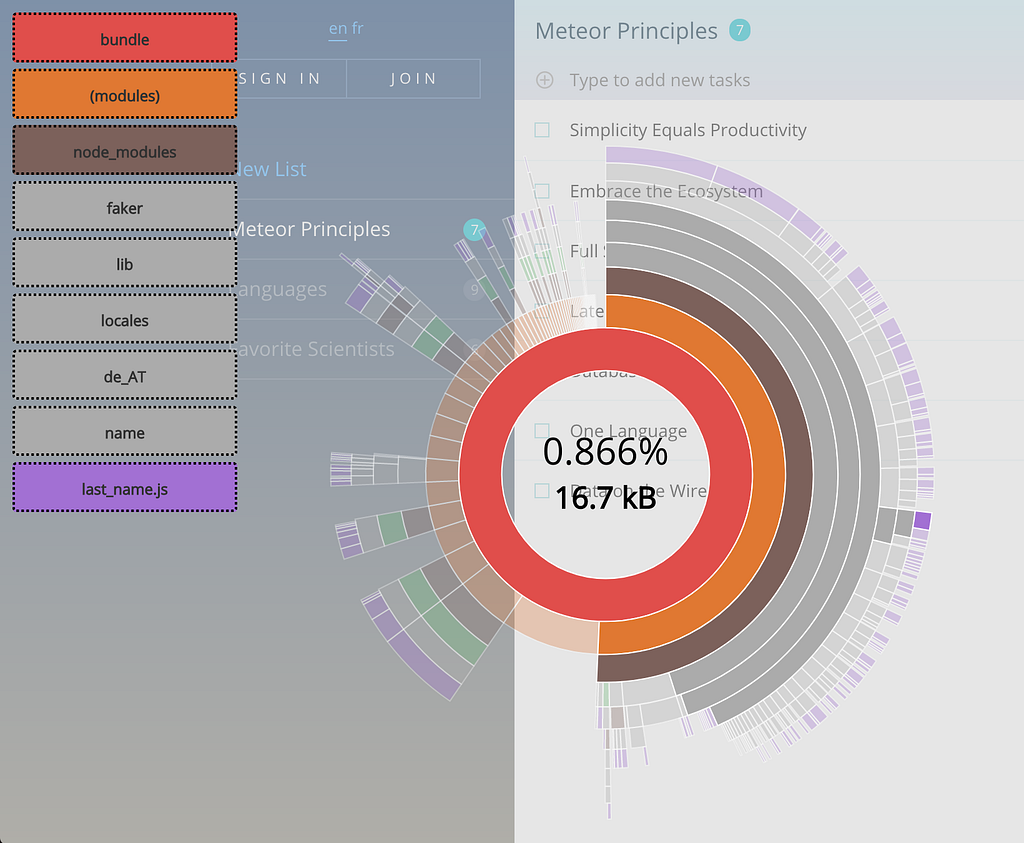
You can see at a glance that this to-dos application is suffering—rather massively—from the accidental inclusion of the faker npm package in production. Importing this library dynamically (in addition to removing the unneeded locales) would cut the bundle size almost in half!

I find it particularly delightful that the chart itself is powered by a dynamically-imported d3 library. In fact, if the visualizer was not imported dynamically, then it would skew the very data it is helping you to visualize, since the bundle-visualizer package depends on more than 100 kB of node_modules.

Note that the --production flag is important because measuring bundle sizes based on unminified source code can be extremely misleading—not to mention disheartening, since a typical Meteor app contains megabytes of unminified code, comments, and whitespace.

Please remember to run meteor remove bundle-visualizer before actually deploying your app to production, since you probably don’t want the visualizer to be visible to your users. On that note, if you have ideas for making the visualizer easier to use, or more useful, you can find its source code here. We look forward to your feedback and pull requests.

Exact code splitting

How does Meteor’s implementation of dynamic import(…) differ from other implementations, like the one in Webpack 2?

Webpack 2 uses your dynamic import(…) calls to pre-build multiple bundles of dynamic modules. There are a lot of interesting details, but the short version is: when you perform a dynamic import(…), one or more of these bundles of modules will be downloaded behind the scenes, containing the module you requested, all of its dependencies, and any other modules that also happen to be in that bundle.

This strategy is appealing because pre-built bundles can be served from a CDN, with HTTP caching, using relatively few HTTP requests. However, bundling also has drawbacks:

  1. Cached bundles are frequently invalidated. When any single module in a bundle changes, the whole bundle has to be downloaded again.
  2. Bundles overlap. You may end up downloading the same module multiple times in different bundles, because it happens to be a dependency of more than one import(…)ed module. To eliminate any overlap between bundles, in theory, you would have to generate enough different bundles to account for every possible ordering of dynamic import(…) calls, but then you would have so many bundles that choosing between them would be tricky, and the benefits of caching would disappear. In practice, Webpack 2 tolerates the overlap.
  3. Effective bundling requires manual configuration. Webpack allows you to configure a “vendor” bundle of infrequently changing code, and the CommonsChunkPlugin moves shared dependencies into a separate bundle, but neither of those techniques is fully automatic, and you should probably still inspect the shared bundles to make sure they don't contain too many modules you don’t need.

By contrast, in the Meteor 1.5 implementation of dynamic import(…), the client has perfect information about which modules were in the initial bundle, which modules are in the browser’s persistent cache, and which modules still need to be fetched. There is never any overlap between requests made by a single client, nor will there be any unneeded modules in the response from the server. You might call this strategy exact code splitting, to differentiate it from bundling.

To avoid the overhead of multiple parallel HTTP requests, Meteor currently fetches dynamic modules using a WebSocket (remember that every Meteor client already has a dedicated socket open to the server). This strategy not only eliminates much of the latency of opening and closing HTTP requests, but also allows for smaller total response sizes, since a single large response tends to compress better than many smaller independent responses, thanks to the way the gzip/deflate algorithms work.

Immutable module caching

The initial JavaScript bundle includes hashes for all available dynamic modules, so the client never has to ask the server if it should use a cached version of a module. If that module’s hash is found in the IndexedDB-based browser cache, then the client can safely use the cached version without any confirmation from the server, and the same version of that module never needs to be downloaded again by the same client. For example, when you update to a totally new version of React, clients who previously visited your site will download only those modules that changed (or were newly introduced) since the previous version. This caching system has all the benefits of immutable caching, if you’ve been hearing about that.

In this implementation, the server doesn’t have to understand the module dependency graph at all, and doesn’t need to remember what modules have already been sent to the client, but merely responds with whatever modules the client says it needs. And because the server is completely stateless, scaling your app to multiple servers/containers can be fully automatic.

To make developing with dynamic modules more predictable and representative of the experience of new visitors, immutable caching is enabled only in production. In other words, don’t be surprised that fetching your dynamic modules in development takes the same amount of time regardless of how many times you’ve fetched them before. To see the impact of the caching, you’ll have to either deploy your app to production, or run it in simulated production mode via meteor run --production.

A word of caution

As I learned during that internship in the summer of 2006, the benefits of code splitting are by no means guaranteed. As you introduce dynamic import(…)s into your application, you should always be measuring the impact, not just in terms of the size of your initial JavaScript bundle, but also the time spent waiting for dynamic modules to arrive.

Generally speaking, if you use the bundle-visualizer to identify large module trees that are not necessary during page load, then it’s probably a good idea to import those modules dynamically. On the other hand, if you take a library that’s critical to the startup of your application and blindly begin importing it dynamically, then your bundle may shrink, but you will probably increase the total time it takes for your application to become ready to use.

What’s next

This implementation of dynamic import(…) is production-ready, but that is not to say there’s nothing left to improve. For example, Meteor could potentially avoid the pitfalls I mentioned in the previous section by detecting when a dynamic module really ought to be in the initial bundle instead, given how soon you typically end up asking for it. As another idea, for some applications, it might make more sense to load dynamic modules via HTTP rather than using a WebSocket. We look forward to your feedback, and we are excited to continue improving this system to suit your needs.

The plan for Meteor 1.6 is simple: upgrade Meteor from Node 4 to Node 6, now that Node 4 no longer enjoys long-term support (LTS), and Node 6 is the official stable version. Much of this work has already happened in parallel with Meteor 1.5, so we anticipate a much shorter release cycle for Meteor 1.6. Please see this pull request if you want to get involved, as your help will surely speed that effort along.

This blog post is by no means our final word on everything new in Meteor 1.5, so stay tuned for follow-up posts in the coming days and weeks. In fact, if you have positive (or at least interesting) experiences with Meteor 1.5 in your own projects, and you have time to contribute an article, we would be more than happy to publish and promote it for you. Just let us know!

Final notes

We recommend reading through the release notes to avoid surprises when updating your apps, and please remember to commit your .meteor directory to version control, just in case you need to roll back to a previous Meteor version. With those recommendations in mind, you should now be ready to meteor update to Meteor 1.5!


Announcing Meteor 1.5 was originally published in Meteor Blog on Medium, where people are continuing the conversation by highlighting and responding to this story.


Unhealthy container replacement now in Galaxy

$
0
0

The health checking system is an important component of Galaxy’s reliability. If a container stops responding to requests, Galaxy automatically routes around the container until it recovers. Many Galaxy customers have requested a solution for containers that do not automatically recover. This may be the result of an oversized request, a race condition, an infinite loop, etc.

Today, we’re happy to announce automatic termination and replacement of unhealthy containers on Galaxy.

How it works

If a previously healthy container fails all health checks for 5 minutes, Galaxy will terminate the container and launch a replacement without any user intervention required. Freshly-launched containers that have never passed an initial health check get ten minutes before replacement, to allow for cache warming.

Unhealthy container replacement in action.

This update also exposes the time a container has spent in its current state, so you know exactly when Galaxy will be replacing it. This information can also be used to detect containers that became unhealthy, then recovered — they’ve been in the “Running” state for less than their launch time.

A container that hasn’t been relaunched… yet.

How to enable it

This feature is now live for any new applications created on Galaxy. You can opt in an existing application by using the “Enable automatic replacement of unhealthy containers” toggle on its “Settings” page on the Galaxy dashboard.

On June 8, 2017, we’ll enable unhealthy container replacement for all existing Galaxy applications. If you’re running an application that is expected to drop users requests for more than 5 minutes (i.e. a “worker”), or want to retain the ability to debug unhealthy containers before they’re replaced, we can leave this setting disabled for you if you contact support.


Unhealthy container replacement now in Galaxy was originally published in Meteor Blog on Medium, where people are continuing the conversation by highlighting and responding to this story.

Putting Your App on a Diet with Meteor 1.5’s Bundle Visualizer

$
0
0

Taking Vulcan from 4.2MB to 1.98MB

Meteor 1.5 just came out, and the big, shiny, new feature is dynamic imports.

But a really cool tool also shipped alongside that feature: the Bundle Visualizer:

This shows you on a graph exactly which Meteor and NPM packages are taking up the most space in your bundle.

To use it, just upgrade your app to Meteor 1.5, add the bundle-visualizer package to it, and then run your app in production mode (meteor --production).

The visualizer may reveal some surprising facts, as it did when I used it on Vulcan!

First Pass: 4.2MB!

I had put off focusing on bundle size for far too long, and it showed! The bundle clocked in at a massive 4.2MB, without gzip:

If you look at the orange bar (second from the center) you can see there’s one long, continuous segment, and then it breaks down in smaller chunks. That continuous segment corresponds to the app’s NPM packages (in other words, the dreaded node_modules folder), which drastically outweigh the actual Meteor code (the little chunks).

Here’s a breakdown of the biggest culprits:

  • intl: 935kb
  • react-intl: 341kb
  • intl-relativeformat: 331kb
  • react-dom: 181kb
  • graphql: 171kb
  • react-bootstrap: 161kb
  • handlebars: 75.8kb
  • core-js: 75.2kb
  • lodash: 72.8kb
  • elliptic: 72.5kb
  • apollo-client: 64kb
  • crypto-js: 56kb
  • intl-messageformat: 55.1kb
  • moment: 49kb
  • simple-schema: 39kb

As you can see, the largest chunk by far was the internationalization packages, with 1.6MB altogether! In other words, 40% of the bundle size was taken up by a feature a majority of people might not always need.

intl, react-intl, and intl-relativeformat: almost 40% of my bundle combined!

Getting Rid of Internationalization (But Not Really)

Now I didn’t want to just throw out internationalization altogether. And I also didn’t want to force people to refactor all their code to get rid of calls to react-intl’s APIs.

So I found a good middle ground: I created a new simplifiedvulcan:i18n package that uses the exact same APIs as react-intl, but only includes its most common features (and none of its dependencies!).

Just replace any react-intl imports by vulcan:i18n imports and you’re good to go! And if you do need the full power of react-intl, creating your own copy of vulcan:i18n that re-exports react-intl shouldn’t be too hard:

export * from 'react-intl`;

Obviously this is not applicable to every situation, but creating your own package versions that only include the features you need can sometimes be a great way to slim down your app.

Result: 1.6MB saved!

Fixing My Imports

Going down the list (or rather, around the circle) another big source of dead weight was react-bootstrap.

Before: importing everything

As useful as that library is, I was only using a tiny fraction of the components it provides. I thought about getting rid of it altogether, but that would mean having to code my own drop-downs, modals, etc. Not fun!

Instead, I found a much simpler fix. It turns out that there is a big difference between:

import { Foo } from 'react-bootstrap';

And

import Foo from 'react-bootstrap/lib/Foo';

The first one will import the entire contents of the package, while the second one will only import the Foo component and its dependencies!

I converted all my imports to the second syntax, and the results speak for themselves:

After: importing only what’s needed

Finding Dependencies

One thing the visualizer doesn’t tell you is where a dependency comes from. For example, I discovered that handlebars was somehow being bundled on the client, but couldn’t tell which NPM package was requiring it.

Turns out there’s a simple command that lets you know just that:

npm ls handlebars

The result told me that handlebars was a dependency of simple-schema, and since I’m pretty sure it’s not really needed, I’m looking forward to shaving off a couple more KBs from my bundle size once that gets removed:

├── handlebars@4.0.6
└─┬ simpl-schema@0.2.3
└─┬ message-box@0.0.2
└── handlebars@4.0.6 dedu

Post-Diet Weight: 1.98MB

After all these optimizations and more, I managed to get the bundle size down to 1.98MB, in other words less than 50% of what I started with!

The funny part: I haven’t even had to use dynamic imports to get these results. I’m looking forward to implementing them and getting even better gains (or losses, I guess?), but I’ll leave that for another post.


Putting Your App on a Diet with Meteor 1.5’s Bundle Visualizer was originally published in Meteor Blog on Medium, where people are continuing the conversation by highlighting and responding to this story.

IP whitelisting now available for Galaxy users in Asia-Pacific

$
0
0

IP whitelisting is now available for Galaxy Pro users in the Asia-Pacific region!

While it’s always important to protect your database and other services with a strong password, you can add an extra layer of security to many services by configuring them to only accept connections from a “whitelist” of IP addresses. For example, this functionality is supported by MongoDB Atlas and Compose MongoDB. In order for this to work, Galaxy has to ensure that all traffic from your app comes from a static set of addresses, which is an extra service we provide to our Galaxy Pro users.

It’s straightforward to enable — starting from your Galaxy dashboard (https://ap-southeast-2.galaxy.meteor.com), navigate to the Settings page for the application you want to secure, then enable Galaxy Professional and IP Whitelisting for that application. Your app will restart, and the management interface will display the list of IPs that you can now add to your database’s security settings.

It’s beneficial to run your application servers and database near your users. Wherever your users are around the world, Galaxy now has you covered with hosting regions in North America, Europe, and Asia-Pacific.


IP whitelisting now available for Galaxy users in Asia-Pacific was originally published in Meteor Blog on Medium, where people are continuing the conversation by highlighting and responding to this story.

The improvements you missed since Meteor 1.4!

$
0
0

Upgrade to Meteor 1.5 for easier app development

On the heels of the Meteor 1.5 release, which introduced the dynamic import(…) statement and exact code-splitting (with no special configuration), many Meteor developers have been slashing their bundle sizes and reaping the benefits of faster client load times thanks to smaller initial client bundles.

As alluring as it is, shedding precious bytes isn’t the only motivating factor for upgrading, and the jump from 1.4 to 1.5 is a big deal in Meteorland. If you’re still running 1.4, 1.3, or something more ancient, it’s a good time to think about actually pressing that <Enter> key the next time you hesitantly type out meteor update.

Major release or not, Meteor strives hard to be backward-compatible. If you haven’t revisited it or are overwhelmed by all the amazing changes in the History file, fire up your development server and give it a shot!

As a reminder, make sure your application’s .meteor directory is committed to your version-control system (e.g. Git, Subversion, etc.) so it’s easy to roll-back if you ever encounter problems during any upgrade.

To update, simply run:

meteor update
C’mon. Do it! Press <Enter>!
Make a left-turn on Must Upgrade Lane and get on Highway One Point Five! (Various vectors thanks to Freepik.)

“Why me? Why upgrade?”

For starters, if you’re using any Meteor version before 1.4 I’d encourage you to take a long, hard look at your project. Whether you want to believe it or not, your application is in need of an update and it’s not just because of Meteor that I’m recommending it!

For example, Meteor 1.3.5.1 shipped with Node.js 0.10.46. As scheduled, the 0.10.x-series was “end of lifed” by the Node.js Foundation in October of 2016. This means that it’s not receiving security updates anymore, including any which have arisen from Node.js dependencies like openssl, tls, and libuv! From a security standpoint, you should make the jump to at least Meteor 1.4 which ships with Node.js 4 and is actively under Node Foundation Long Term Support (LTS) coverage.

Meteor usage by version, as of June 13, 2017. Meteor 1.5 is quickly taking over!

There are true gems spread throughout 1.4…

The Meteor 1.4 series brought a lot of fun improvements. 1.4.2.7? 1.4.1.2? 1.4.4.3? These quadruples were serious version numbers!

Let’s recap what developed! (And try to guilt you into updating.)

Modern language, zero config.

Meteor 1.4.x kept bringing newer ECMAScript syntax out-of-the-box, without the need to make custom configurations to support them. To name a few:

React? Blaze? jQuery? Bring what you want, ditch what you don’t.

While Blaze and jQuery are still friends with Meteor, great strides were taken to allow their removal, providing freedom to explore other options.

React and Meteor also play nicely together, but previously it was hard to avoid shipping the overhead of Blaze and jQuery to the client if you didn’t need them.

Thanks to work started last October and wrapping up with amazing work by the community (particularly Hugh Willson and Wexpo Lyu) to de-couple Meteor Accounts packages from Blaze, it’s now possible to achieve this setup.

To remove both Blaze and jQuery from a new Meteor 1.5 project, simply run:

meteor remove blaze-html-templates
meteor add static-html

Don’t forget, React and Blaze can co-exist, so if you like taking small bites it may ease your way through a transition if you choose to embark on that journey.

Speed & stability

Apps keep getting larger and their dependencies more complicated (Targeted advertising: Putting your app on a diet). Developers, however, sang praise when Meteor 1.4.2 cut down their rebuild times. (Thankfully, since that was its goal!)

Many improvements in this department are made directly to Meteor and plenty more are thanks to a constant stream of updates to its dependencies — and there were plenty.

For example, 1.4.x went through nine iterations on the Node.js 4.x-series, and also brought in the (then) newer npm 4 — which came with more friendly messaging (like reminding you when you’ve installed something in both devDependencies and dependencies), an awesome CLI search, shrinkwrapping of devDependencies and plenty of speed and bug fixes.

As the next step, our sights are set on Node 8 and npm 5 for Meteor 1.6. That’s right, we’re skipping Node 6 entirely.

Other dependencies with major updates included:

  • MongoDB (and improved connectivity from the Mongo Node Driver)
  • Cordova
  • CoffeeScript (now supports import and export)

Microsoft Windows users also received a number of benefits including many filesystem improvements and further tweaks to allow running the Unix meteor through Bash On Windows (via the Windows Creators Update).

Pre-scaffolded applications

If you are meteor create-ing new applications on a regular basis you’ll likely find the new --full and --bare scaffolding flags very helpful! While the default option maintains the “classic” method you’re used to, the “full” option will produce a more structured application using the module-driven import approach, as recommended by the Meteor Guide’s Application Structure. On the other hand, the “bare” option will give you no starter files and a completely fresh slate to build your own.

Meteor maintainability

A number of improvements to the underlying architecture in Meteor have made it possible for Meteor to release updates with a higher velocity than ever before.

With 1.4 came the ability for Meteor to handle recompiling binary-dependencies from Atmosphere packages on its own. Developers need a compiler toolchain to do this (and many will already have it installed), but this allows Meteor to upgrade to newer versions of Node.js more quickly without potentially breaking existing binaries and necessitating package developers to re-release their packages with each major version upgrade.

To further allow Meteor to move more quickly, versions of core packages are no longer strictly constrained to core releases. This means that an important feature for say, email, doesn’t need to wait for another major version of Meteor itself. Despite this, there were more releases than ever before in 2016.

Meteor in 2017 is looking great!

Things are moving quicker!

Easy goes it

I’m confident that applications that have inched along the upgrade path as new releases came out will have little to no problems making the update to Meteor 1.5.

However, if you’re updating older applications, I’m happy to report that I’ve recently updated a half-dozen Meteor applications directly from pre-1.3 to Meteor 1.4 in about an hour each, with little struggle.

Check out the Meteor 1.5 migration guide if you’re looking for a place to start. However, it’s relatively straightforward, so get with the latest Meteor!


The improvements you missed since Meteor 1.4! was originally published in Meteor Blog on Medium, where people are continuing the conversation by highlighting and responding to this story.

VulcanJS: An Open-Source Project to “Meteorize” GraphQL

$
0
0

A full-stack app-building framework with React and GraphQL

This is a guest post from Sacha Greif, co-author of Discover Meteor and creator of VulcanJS and Sidebar.

When Meteor first came out in 2012, it put out a pretty groundbreaking vision: full-stack JavaScript, client-server reactivity, a unified development environment… And what’s even more amazing is that five years later, that original vision still hasn’t been matched.

Meanwhile, the JavaScript ecosystem has been making advances in the direction of modularity. The end result is a more mature, more solid JavaScript ecosystem thanks to amazing tools like React and Redux.

Still, what if there was a way to get the best of both worlds? In other words, the ease of use of Meteor combined with the flexibility of modern JavaScript libraries?

Note: just to be 100% clear, Vulcan is a community initiative and is in no way affiliated with the Meteor or Apollo projects. But I do think that they all work great together, as you’ll soon see!

Discovering Apollo

Before I go on, let me tell you a bit more about myself. I started using Meteor back in 2012 to build a little side project that ended up becoming Telescope, one of the most popular Meteor open-source apps.

As I was building Telescope, I also teamed up with Tom Coleman to take everything we’d learned so far about Meteor and put it into a book, Discover Meteor.

Despite my love for Meteor, over the past couple years I’ve started making efforts to broaden my horizons. I learned React (and ported Telescope to it), then got familiar with Redux, and six months ago started looking into Apollo, Meteor Development Group’s new GraphQL data layer project.

The Power of GraphQL

GraphQL is a query language that gives you a way to write a platform-agnostic, database-agnostic data layer and query it through a very natural and expressive syntax; and if you’re wondering what all the fuss is about, then I wrote the perfect blog post for you.

GraphQL as a personal assistant

Since GraphQL is just a syntax specification, you need a set of tools to take advantage of it, which is exactly where Apollo comes in.

After a few weeks playing with Apollo and GraphQL, I decided to make the switch and port Telescope to this new data layer. At the end of the day, my decision boiled down to three main factors:

  • GraphQL being database-agnostic means it’s easier to use databases other than MongoDB.
  • Unlike Meteor, Apollo is not real-time by default, which means better server performance for apps that don’t need real-time.
  • Apollo is not limited to the Meteor ecosystem, meaning a potentially larger developer community, more resources, more tools, etc.
The new Vulcan stack

But as it turns out, swapping out your entire data layer is easier said than done! And I soon discovered that Meteor had spoiled me in some aspects…

The Challenges of Apollo

When you stop to think about it, Meteor’s decision to use MongoDB both on the server and client was a stroke of genius when it comes to data updating: when a document is created or updated on the server, the same operation can be replicated on the client with no ambiguity whatsoever, all in an automated fashion.

Apollo, on the other hand, stores its data in a Redux store. While this is great in terms of flexibility and inter-operability, it does mean that when a new document is inserted in your database, Apollo won’t have a clue what to do with it.

In other words, once I switched to Apollo data sync was now something that needed to be handled manually for many operations, which as you might expect was quite different from what I was used to with Meteor.

Manually updating the Redux store with react-apollo

But I did end up getting the hang of it, as well as understanding many other aspects of the Apollo stack. Which leads us to where we are today with Vulcan.

Vulcan: “Meteorizing” Apollo

Vulcan is the follow-up to the original Telescope project. It’s the result of all these months experimenting with Apollo, and all the many years using Meteor that came before that. Here’s a quick video intro about Vulcan, or else just keep reading!

In a nutshell, Vulcan is an app-building framework for Meteor architected around Apollo and React, and its goal is to bring Meteor’s original vision and simplicity back; except this time using modern, standardized JavaScript libraries.

In practice, Vulcan achieves this through the following core features:

Rich Schemas

In Vulcan, everything starts with your collection’s JSON schema. You can use it to specify field types, default values, and various other validation options, but you can also go much further, using it to control which fields should be published to which users, as well as which groups can modify any given field:

postedAt: {
type: Date,
optional: true,
viewableBy: ['guests'],
insertableBy: ['admins'],
editableBy: ['admins'],
control: 'datetime'
}

Based on this information, Vulcan can then auto-generate your GraphQL schema from your collection schemas, saving you the effort of writing your schemas twice.

Powerful Forms

Having access to rich schemas also lets Vulcan generate and handle forms for you (like if Autoform had been baked right into Meteor).

In other words, if you mark a schema field as editableBy: ['admins'], then Vulcan will know to only show that form field to admins on the client, and disallow any updates to that field by non-admins on the server.

And since you have all the power of React at your fingertips, you can use any React component you want inside your form. Think datepickers, multi-selects, or even integrations with third-party services like Embedly or Google Maps:

A form with custom components, as seen on GambaClimbing.com

Easy Data Layer

Vulcan also gives you a number of utilities and helpers to make using Apollo easier. For example, in order to load data on the client you can use the built-in withList higher-order component:

const options = {
collection: Posts,
fragmentName: ‘PostsList’
};
export default withList(PostsList);

Just specify the collection to load data from, as well as a fragment (in other words, a list of field names) specifying which fields to load, and the withList function will do the rest, loading your data and passing it on to the PostsList component as a results prop.

Never worry about manually updating your store again!

And like I said, Vulcan’s goal is to “meteorize” Apollo, making it as painless to use as good old Minimongo. Which is why withList will also transparently take care of keeping your Redux store in sync with the database for you when it comes to the main insert/edit/remove mutations.

Sidebar, running Vulcan in production

Enjoy Server-Side Rendering, User Accounts, and more…

So far we’ve only scratched the surface of what Vulcan can do. Besides classic features like a user accounts package and built-in server-side rendering, Vulcan also has packages for things like generating an email newsletter from your content, scraping URLs for metadata, as well as example projects such as Instagram and Hacker News clones.

…Or Don’t!

Vulcan was built with modularity in mind from the start, and the fact that it uses a package-based architecture means you can replace any aspect of the app with your own custom package without breaking the rest of the codebase.

What’s more, this philosophy extends everywhere in Vulcan. Would you rather handle your GraphQL schema yourself? Then just turn off schema generation and provide your own. Like to write your own higher-order components? Then just replace the afore-mentioned withList with your own tailor-made version. Anything that Vulcan offers can also be turned off if you prefer.

So Why Vulcan?

More than a list of features or technologies, Vulcan boils down to a vision: make it easier than ever to quickly build new apps, without sacrificing scalability and maintainability.

It does this by building on top of strong foundations, and in a way that lets you swap out any part at any moment.

Getting Started

So if you’d like to give Vulcan a shot, here’s the three things you need to do:

  1. Install Vulcan (5 min)
  2. Work through the Movies Example tutorial (45 min)
  3. Watch the Instagram Example video and go through the example’s code (30 min)

This should be more than enough to give you a good idea of how Vulcan works, and whether or not it fits your needs. And don’t hesitate to join our Slack chatroom if you have any questions, or just want to say hello!


VulcanJS: An Open-Source Project to “Meteorize” GraphQL was originally published in Meteor Blog on Medium, where people are continuing the conversation by highlighting and responding to this story.

Improving App Performance with Meteor APM and Galaxy Pro

$
0
0

Our experience setting up Galaxy Pro for I ❤ Meteor

This is a guest post that originally appeared on The Meteor Chef, a community-maintained resource for Meteor documentation and education.

When we at The Meteor Chef last checked in our site I ❤ Meteor, we’d successfully deployed the application to Meteor’s Galaxy Hosting Service and rigged up DNS so users could access the app. Since then, the folks behind Galaxy at Meteor Development Group released an upgraded version of Galaxy — Galaxy Pro — that introduces some interesting features to further simplify the devops process.

Since we deployed, the performance of I ❤ Meteor has been a bit of a mystery. Save for general performance metrics in the Galaxy Dashboard (Active connections, CPU usage, and Memory usage) it’s been difficult to identify bottlenecks in the application and work toward improving performance. To help with this, Galaxy Pro has introduced a new feature — Meteor APM (application performance monitoring) — that gives insight into potential problem areas like:

  • Publication and Subscription performance
  • Meteor Method performance
  • Live Query performance
  • Client and Server error tracking

In this tutorial, we’ll take a look at how to configure and make use of Meteor APM, learning how to improve the overall performance of our application. We’ll learn how to enable performance monitoring as well as client-side error tracking to keep our eye on as much as possible.

In addition to improved performance tracking, Galaxy Pro also gives us access to IP Whitelisting: a means for getting the IP addresses that Galaxy makes requests from. We’ll see how to make use of this by setting up a staging database for I ❤ Meteor on the MongoDB Atlas service — a hosted MongoDB solution — which requires the IP addresses of the servers connecting to the its databases.

To get started, we’ll need to do some housekeeping to make sure our app plays nice with Galaxy Pro, and more specifically, Meteor APM. Let’s do it!

Prerequisites

Before we get started, make sure to complete the following steps. This will ensure that you have all of the code and dependencies you need to complete the tutorial. Because we already built I ❤ Meteor in another tutorial on deploying with Galaxy, we’ll use the code from there to save us some headaches. After you’ve cloned a copy of the app, make sure to install all of the dependencies in the next section.

git clone https://github.com/themeteorchef/deploying-with-meteor-galaxy.git && cd deploying-with-meteor-galaxy && npm install

If you’d rather just see the changes made for this tutorial, you can download the repo for this tutorial separately:

git clone https://github.com/themeteorchef/enhanced-deployments-with-galaxy-pro.git && cd enhanced-deployments-with-galaxy-pro && npm install

Keep in mind: if you download this second repo, you will already have the necessary packages and code installed and can skip to the “Upgrading to Galaxy Pro” section below.

Preparing for Galaxy Pro

Before we dig into upgrading I ❤ Meteor’s deployment to Galaxy Pro, we need to make a few minor tweaks to our application locally. First, it’s important to note that Galaxy’s Meteor APM offering is a rebranded version of another service, Kadira, which was purchased by the Meteor Development Group in March, 2017.

First: remove any Kadira packages

Kadira was fairly popular in the Meteor community and had its own set of packages for enabling application performance monitoring. If you were a Kadira customer in the past, before you add the packages below you’ll want to remove any Kadira-related packages. Specifically, you’ll want to remove the meteorhacks:kadira with meteor remove meteorhacks:kadira.

Requirements for Meteor APM

With any Kadira-related packages uninstalled, next, we need to add support for two packages that will enable support for Meteor APM:

meteor add mdg:meteor-apm-agent

This package will enable support for Publication and Subscription monitoring, Meteor Method monitoring, and Live Query monitoring.

meteor add meteorhacks:zones

This package will give Meteor APM better access to client-side errors. This is important because we want to be able to see when something goes wrong in one of our user’s browsers (the client).

With these installed, we’re all set to start monitoring the performance of our application and find any performance holes we need to plug. Before we do, though, we need to upgrade our application to Galaxy Pro.

Upgrading to Galaxy Pro

Coming up, we’re going to make a few changes to our application in order to test out some of Galaxy Pro’s features. Before we do, though, we need to make sure that we’ve upgraded our containers on Galaxy to Galaxy Pro. Good news: it’s super easy.

One click to upgrade? Not bad at all.

Assuming you’ve already deployed your app to Galaxy (if you haven’t make sure to give our deployment tutorial a read), click on the domain for the application you’d like to upgrade and head to the “Settings” tab. From there, at the top of the page you’ll see a button “Upgrade to Professional” that will delete your application and send you a bill for $1,000,000 USD, via fax.

Price changes when you enable Galaxy Professional on your containers, as of July 2017.

Poor jokes aside, no, this will prompt you with a confirmation to upgrade your existing containers to Galaxy Professional (fair warning: this will increase the price per hour on your containers slightly — with charges increased from your container tier’s base price). Once complete, you’ll see some new options and information appear in the same space.

Make sure to deploy after installing packages and upgrading

In order to get access to the features we’ll demonstrate below, it’s important to deploy your application after adding the packages we’ve outlined above. Without them, Meteor APM will not be able to read any data from your application.

To demystify the service a bit, we’ll spend the rest of the tutorial walking you through how Galaxy Professional can help to improve the performance and extensibility of your Meteor application.

Adding images and monitoring performance with APM

While version 1 of I ❤ Meteor was neat, something we’ve been missing is images to help projects stand out. Now, we’re going to add support for attaching an image when submitting a project which, conveniently, will require a remote API call to Amazon S3 to store the image. This is great because it will help us to understand how to use Galaxy’s new APM feature and figure out how to speed things up for users.

While we’re not going to a deep dive on how to implement image uploading (give our uploading files with Amazon S3 tutorial a read if you’re curious), we do want to call attention to how we’re ultimately passing images to Amazon S3 on the server. After the file is read on the client, we pass the details of the file (including its raw data) up to a method which then passes the file along to Amazon S3 for storage. While we expect our writes to be fairly speedy, there’s no guarantee.

Our call to S3 (in our /imports/api/projects/server/methods.js) looks like this:

export const submitProject = new ValidatedMethod({
name: ‘projects.submit’,
validate: new SimpleSchema({
title: { type: String },
url: { type: String },
createdBy: { type: String },
image: { type: Object, blackbox: true },
}).validator(),
run(project) {
const projectToInsert = project;
projectToInsert.owner = this.userId;
return s3.putObject(project.image)
.then((image) => {
if (image) projectToInsert.image = image;
return Projects.insert(projectToInsert);
})
.catch((error) => {
throw new Meteor.Error(‘500’, `${error}`);
});
},
});

Inside of our projects.submit method, we make a call to a module method s3.putObject to actually fire the upload. Notice that we do this before we insert a project into the database, meaning, we need to wait for a URL back from S3 before the project is created in our database.

Measuring performance

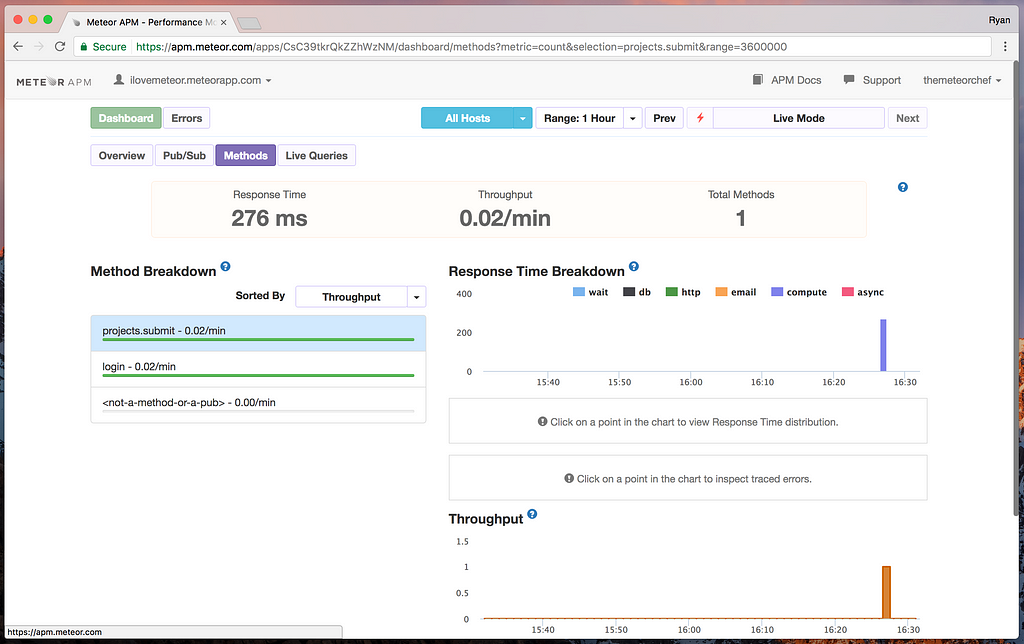
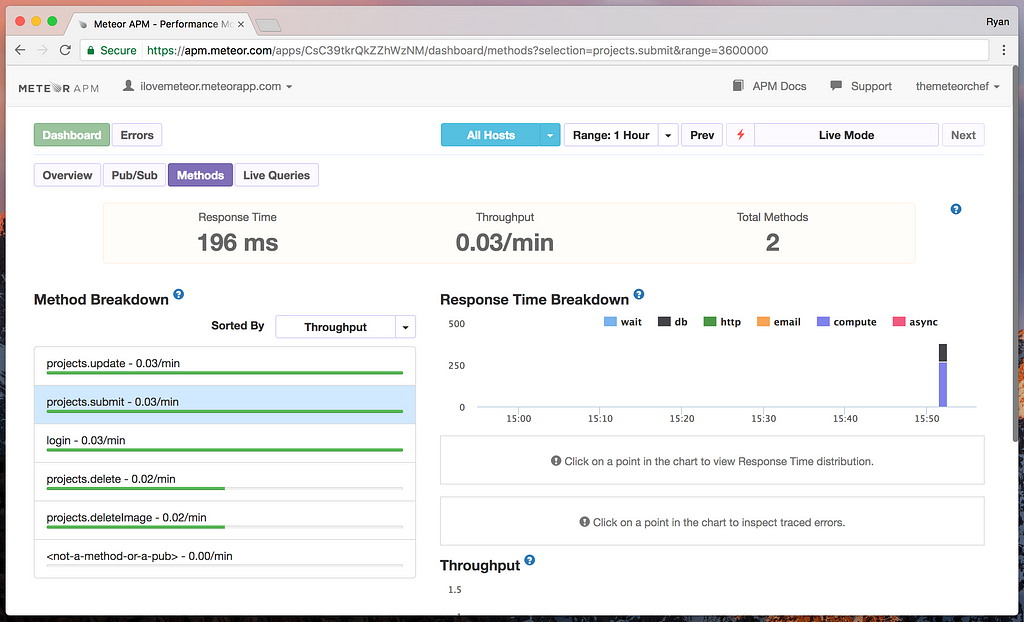
To get a feel for how our method performs, if we hop over to Meteor APM, we can see the general response time:

Monitoring Method performance in Meteor APM.

In the Meteor APM dashboard, if we flip over to the “Methods” tab and click on the projects.submit method, we can see that the response time was 276ms (milliseconds). This means that from the time we clicked the submit button, it took 276ms for our method to send back a response. Generally speaking, that’s not bad for a remote call, but we can do better.

We want to pay attention to is how Meteor APM is helping us. Without this information, we’d be more-or-less guessing on the performance of our method call. With APM, we’re getting real and live data about the performance of our application, allowing us to make quick fixes and deliver a better experience to customers.

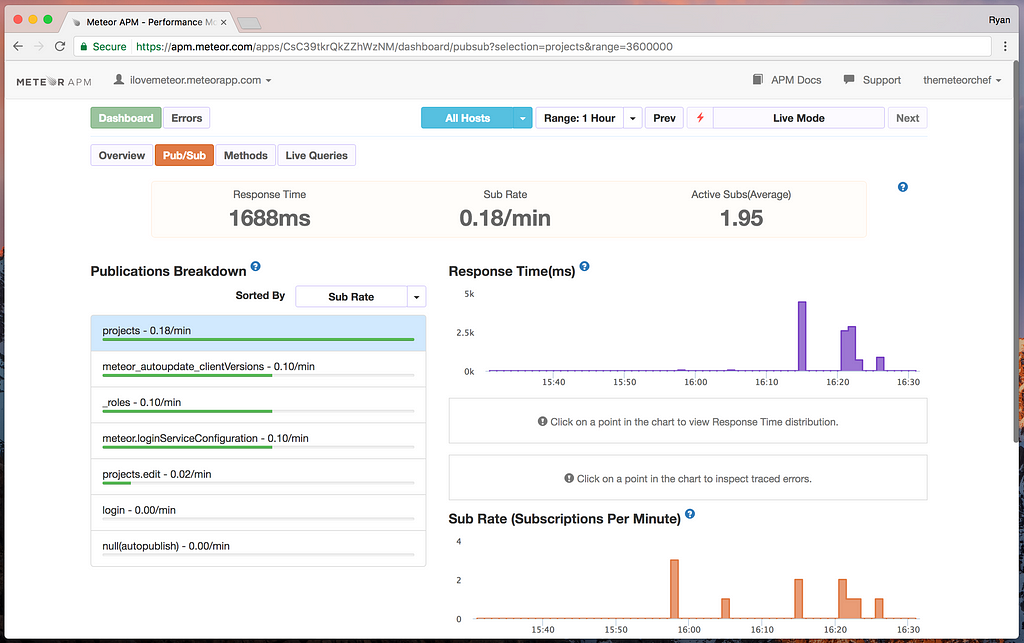
Monitoring Pub/Sub performance in Meteor APM.

Switching over to the “Pub/Sub” tab and clicking on our projects publication, we can see that its performance is pretty terrible. The 1688ms “Response Time” listed here means that from the time the client connected to the app, it took nearly two seconds to receive a response from the server for just this one subscription.

In our /imports/api/projects/server/publications.js:

Meteor.publish(‘projects’, function projectsPublication(query, projection, paginationLimit) {
check(query, Object);
check(projection, Object);
check(paginationLimit, Number);

const queryToAssign = query;
const projectionToAssign = projection;

const isFavorites = queryToAssign[‘favoritedBy.userId’];
const isSubmissions = queryToAssign.owner;

if (isFavorites) queryToAssign[‘favoritedBy.userId’] = this.userId;
if (isSubmissions) queryToAssign.owner = this.userId;

// projectionToAssign.limit = paginationLimit;
return Projects.find(queryToAssign, projectionToAssign);
});

Why is that number so high?

Well, technically, on the client I ❤ Meteor is set up with infinite scrolling pagination, meaning, we limit the number of posts on screen to 24 projects on first load. In the code above, we’ve commented out this limit, meaning all projects are published to the client at once. For our example “Response Time,” we loaded up our database with 1000+ documents. Translation? Without a limit our publication is sending 1000+ documents to each client as soon as they connect.

You may be thinking “Jeeze, two seconds is pretty good…isn’t it?” If we only had one user? Sure, not terrible. However, this is the response time for a single connected client, meaning, for each user that connects, they’re all receiving this response time. The punchline is that the response time is high because we’re sending too much data on load (the user obviously cannot see all 1000 projects at once) and our server is having to process each of those requests, leading to an unnecessary waste of server resources.

Again, good-guy APM is letting you know who’s got their hand in the cookie jar so we can correct it. In case the correction isn’t clear, we just need to uncomment our limit in our publication on the server so that it properly kinks the hose, only letting out a few projects at a time. That sounds suggestive. It isn’t.

Reviewing the stack trace for our pub/sub response time.

Improving performance

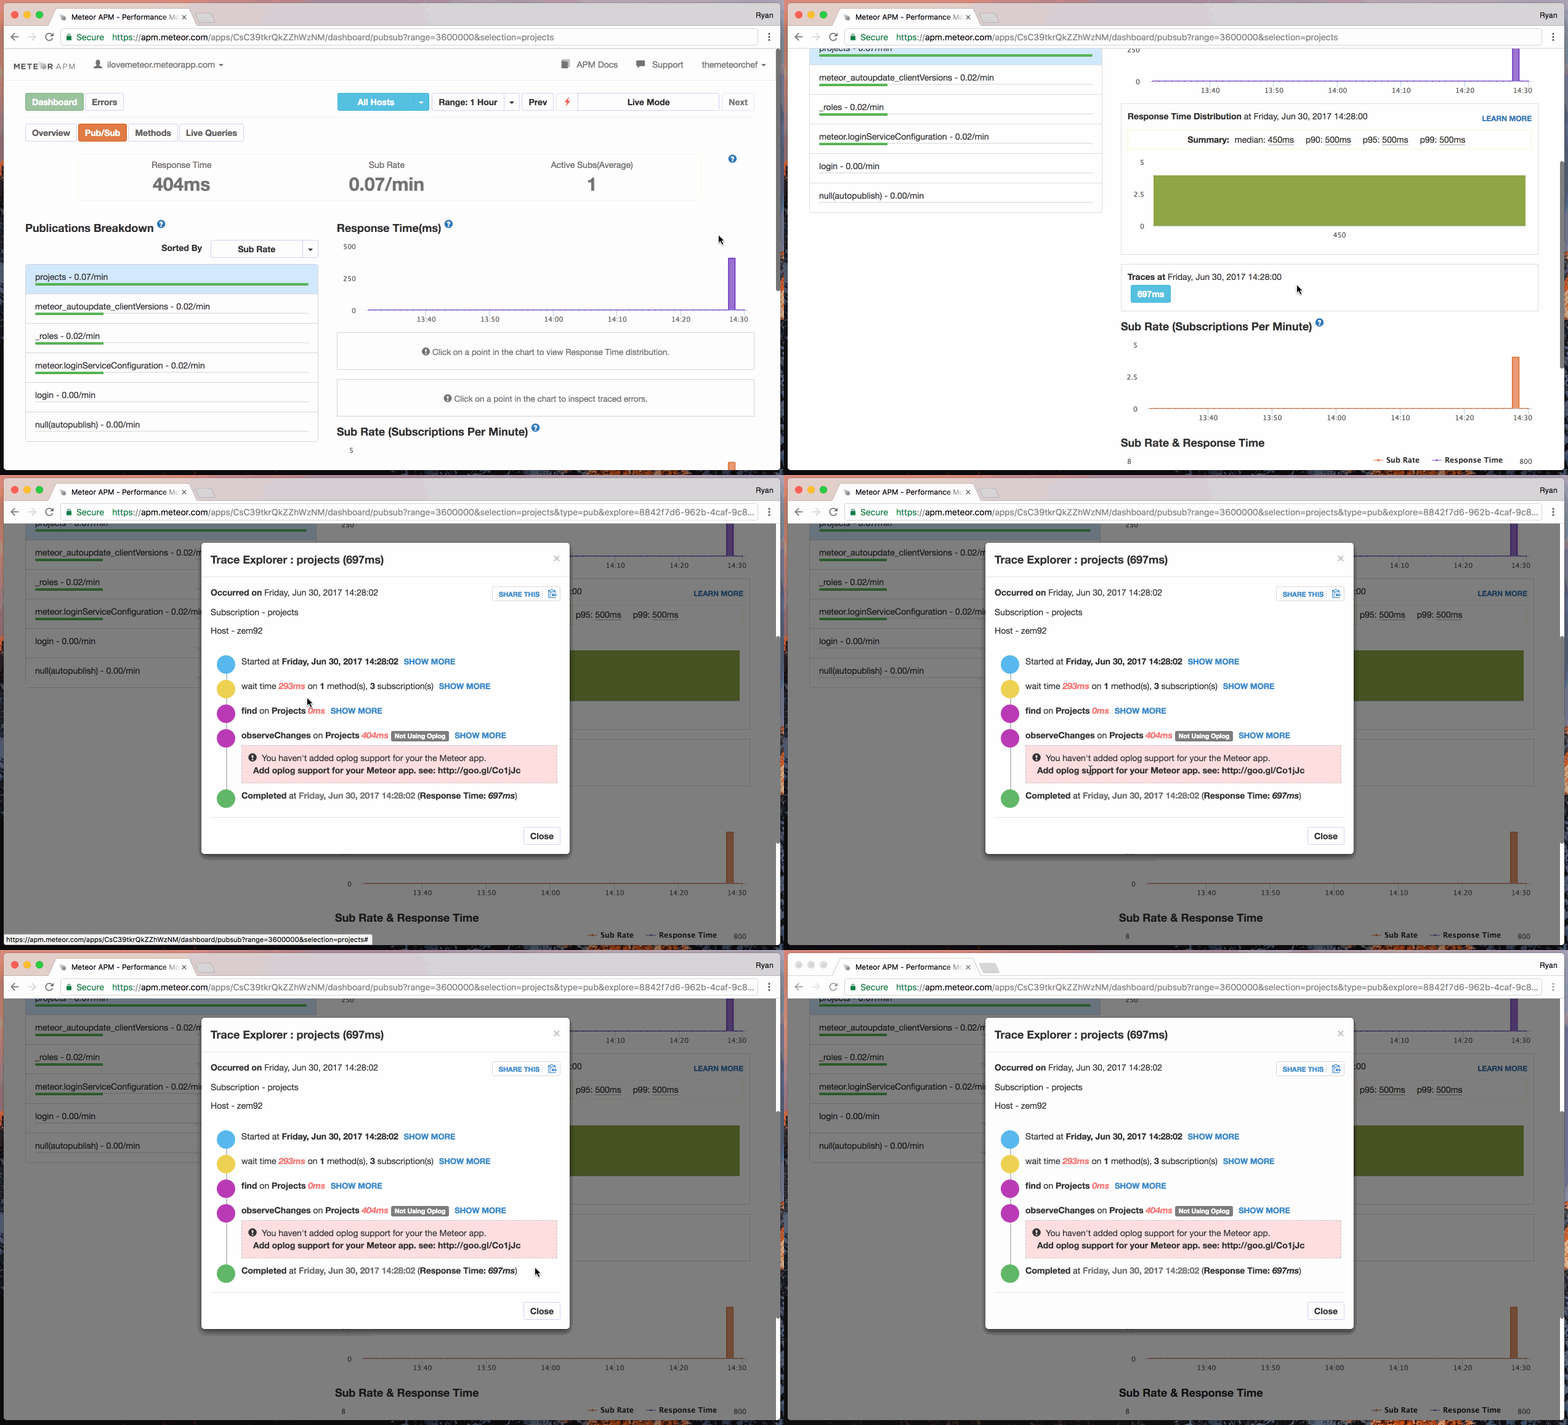
Updating our publication code to include our limit again, if we redeploy, we can see a significant improvement in response time, down to 404ms. This is much better, however, we can improve it further. While the “Response Time” here is helpful, Meteor APM can help us dig in even further and see more information about the stack trace of our request (literally, the timeline of operations between opening the connecting and getting a response).

In the GIF above, if we look at the stack trace for our projects publication — accessible by clicking on a point in the “Response Time (ms)” chart and scrolling down to click on the blue button under “Traces at” — we can see a blip in our stack trace. Here, our response time seems to be slowing down because we haven’t enabled MongoDB oplog support.

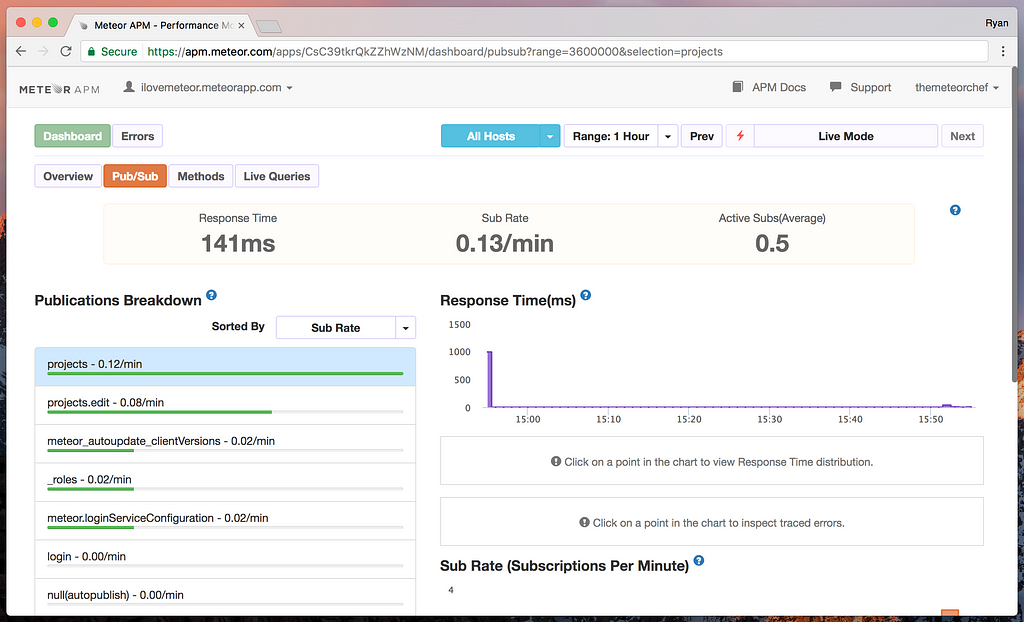
If we follow the breadcrumb trail laid by Meteor APM and add support for MongoDB oplog tailing to our application, we can see our application’s performance improve on our next deployment:

You can almost smell the money this is saving.

Well dang, Meteor APM, you just earned your keep fast. With just two changes that would have otherwise been next-to-invisible, we dropped our pub/sub response time down from 1688ms to 141ms, gaining our users back 1.5 seconds of their lives. Impressive, right? What if we apply this same process to our methods? Making a quick modification to our method code in /imports/api/projects/server/methods.js:

export const submitProject = new ValidatedMethod({
name: ‘projects.submit’,
validate: new SimpleSchema({
title: { type: String },
url: { type: String },
createdBy: { type: String },
image: { type: Object, blackbox: true, optional: true },
}).validator(),
run(project) {
const projectToInsert = project;
projectToInsert.owner = this.userId;
const imageToInsert = projectToInsert.image;
delete projectToInsert.image;

const projectId = Projects.insert(projectToInsert);

s3.putObject(imageToInsert)
.then((image) => {
if (image) Projects.update(projectId, { $set: { image } });
})
.catch((error) => {
throw new Meteor.Error(‘500’, `${error}`);
});

return projectId;
},
});

Where above our new project creation was dependent on receiving a URL back from Amazon S3 first, here, we’ve refactored our code to not do this. Instead, we create our project first and then attempt to store our image on Amazon S3. On the client, we have a placeholder image loaded until we get a response back from S3. Once we do, we go ahead and update the project we just inserted into the Projects collection. With this, we skip an unnecessary wait on Amazon S3 and can respond to the user much quicker.

If we deploy this change to Galaxy and look at our Method response time…

Our newer, better response time.

Put some relish on that hot dog: it’s eatin’ time! Wait…what? Ignoring that, though not as dramatic, we’ve managed to decrease our projects.submit method’s response time by 80ms. While this may seem trivial, when it comes to application performance an “every penny counts” attitude is key. Any time we can save our users means happier customers and a lighter load on our servers. Win!

Watching for and correcting client-side errors

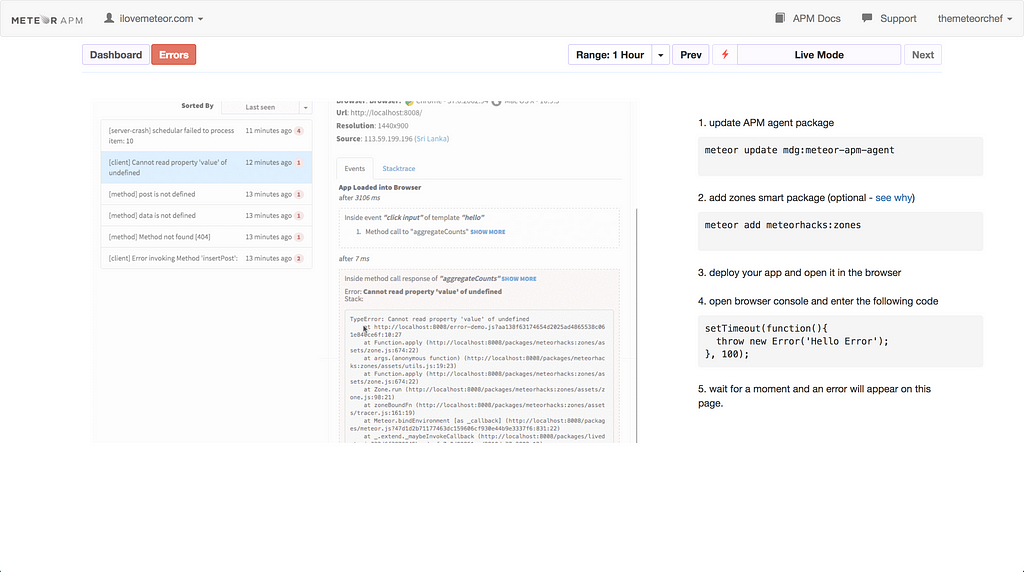
Galaxy APM makes this almost a little…too easy. Regardless, we should take a look as there are a few discrete steps.

In case our instructions don’t make any sense, Meteor APM offers their own, too.

First and foremost, we need to make sure that we’ve enabled support for client-side error tracking by installing the meteorhacks:zones package. In case you’re wondering, yes, this package was originally offered by the folks at Kadira but is now maintained by the Meteor Development Group (translation: safe as spaghetti sauce). From your project, in the terminal:

meteor add meteorhacks:zones

Once this is installed, make sure to deploy your application to Galaxy as any client-side errors in your development environment will not be tracked. Once your application is deployed, head over to the “Errors” tab in Meteor APM (visible in the top-left of the dashboard beneath the “Meteor APM” logo). If any client errors occur on any connected client, they will now appear here.

As an example, if we connect to our deployed application (e.g., https://www.ilovemeteor.com) in the browser console we can run:

setTimeout(() => { throw new Error(‘These pretzels are making me thirsty!’); }, 100);

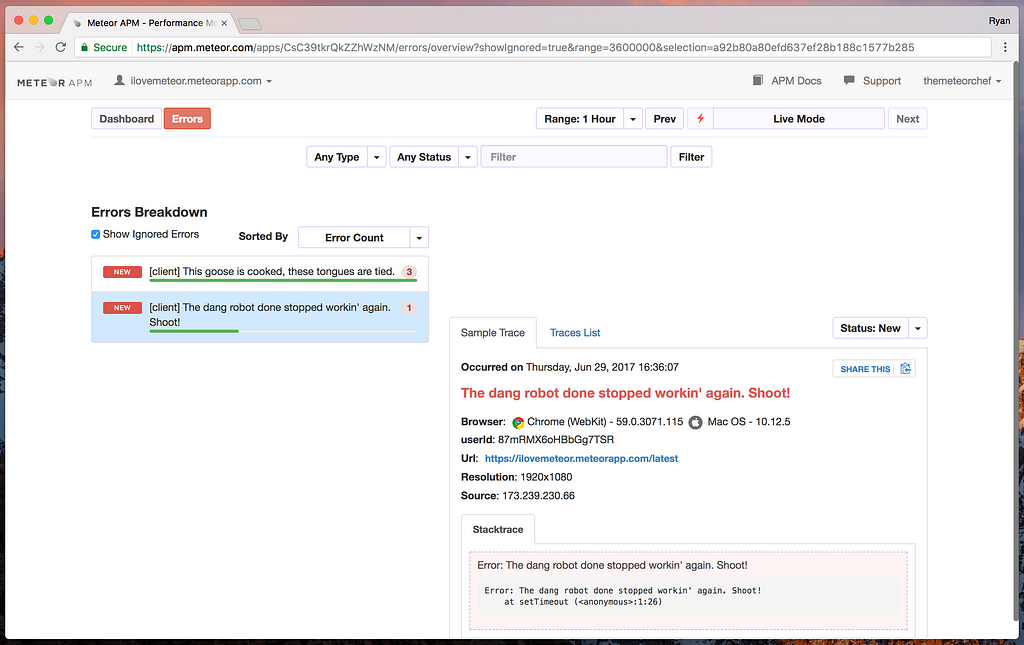
After a few seconds — potentially a bit longer if there are clouds over San Francisco — we should see our error pop up in Meteor APM:

Client-side errors appearing in Meteor APM.

Pretty neat, right? Not only do we see the errors that were thrown, but we get access to the user’s browser information, the exact date and time the error occurred, the URL they were on when the error occurred, and a full stack trace. Having this information means solving client-side errors much faster, avoiding the whack-a-mole “works on my machine” strategy for bug fixes.

Looking for more?
While we’ve covered the basics of working with Meteor APM, we highly recommend reading the Getting Started with APM guide to get a detailed look at the APM dashboard and all of the features it includes.

With this in place, next, let’s take a look at Galaxy Pro’s IP whitelisting feature to see how we can connect our app to third-party services securely.

Enabling and using IP whitelisting

As part of our upgrade, one thing I ❤ Meteor has been missing is a staging server. While the app’s production database is hosted on mLab, for staging, we want to test out hosting our database on the MongoDB Atlas service. In order to connect to any databases we create on Atlas, we’re required to list the IP addresses of any servers connecting to the database. Fortunately, with Galaxy Pro we can get access to this information and set up our connection without a lot of fuss.

Getting access to Galaxy’s IP addresses

You may be thinking “I already know how to do this” if you were paying attention earlier when we upgraded I ❤ Meteor’s containers to the “Professional” level on Galaxy. If not, what we need to do is head back to Galaxy dashboard and access the “Settings” tab for our app.

A really, super difficult button click to enable IP Whitelisting. /s

Up toward the top under the now-visible “Galaxy Professional” block, we want to click the “Enable IP Whitelisting” button. When we do, we’ll automatically see a list of IP addresses mapping to our containers appear over on the left in green (and see the “IP Whitelisting” header show “Enabled” instead of “Disabled”). That’s it! Now we have access to the IP addresses for our container.

To make sure usage is clear, let’s jump over to the MongoDB Atlas service where our database will be hosted and see how to put these addresses to use.

Making use of our Galaxy IP addresses

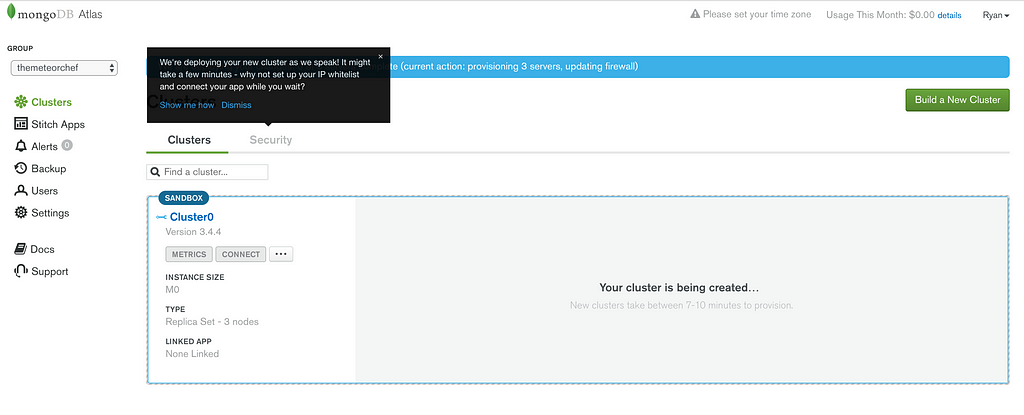
We’re going to skip ahead a bit in the process now and assume you’ve already signed up for a MongoDB Atlas account here. Once you’ve signed up and created your first cluster, you should be logged in and see a message about your cluster being deployed:

A suggestion to set up IP Whitelisting while our cluster is deployed.

Inside of that message, we can see a suggestion to set up IP Whitelisting for our app under the “Security” tab in our dashboard. If we jump over there, we can click on the green “Add IP Address” button to reveal a modal to enter our IP addresses.

Adding IP addresses for Galaxy to our cluster.

As the helper text suggests, this will allow us to securely connect to our database on MongoDB Atlas without any issues. Optionally, we can set a comment (a wise choice) to let us know who issues this IP address. For convention sake, something like Meteor Galaxy #1 (up through #4 for each IP address) should do the trick.

Once we’ve added each of these, we’re all set! If we boot up our production app, we should have access to our database on MongoDB Atlas without any issues. If you’re feeling curious, try removing these IPs to see how the connection fails. Destruction!

Wrapping up

Well, that about does it for now! I ❤ Meteor is up and running on Galaxy Pro, we’ve configured our app for performance monitoring and error tracking, and we even connected our staging server to a database using IP whitelisting. From here, it’s up to us to keep a watchful eye on performance and errors.

If we run into any snags, though, Galaxy Pro offers prioritized support, meaning any support requests are bumped up in Galaxy’s support queue for faster service! Nice.

Pretty good. Pretty, pretty, pretty, pretty good.

Takeaways

  • Galaxy Pro gives us access to a great set of tools for monitoring application performance and behavior with Meteor APM.
  • If our application uses third-party services that require access to our server’s IP addresses, Galaxy Pro’s IP whitelisting is a must-have.
  • Overall, Galaxy Pro is pretty dang easy to set up. Just a few packages and a few clicks to improve our devops setup.

Improving App Performance with Meteor APM and Galaxy Pro was originally published in Meteor Blog on Medium, where people are continuing the conversation by highlighting and responding to this story.

Managing forms in a Meteor/React project with uniforms

$
0
0

Managing forms in a Meteor/React project with the uniforms package

This is a guest blog post from Maciek Stasiełuk, software architect at Vazco.eu, a Meteor-focused software house based in Poland and the UK that’s always trying to stay on the bleeding edge.

If you’ve created a more complex React app before, then you know that managing forms can be a really tedious task. We may have a solution for that! In this article, we’ll introduce a new package we’ve built to more easily manage forms in Meteor/React apps, take you through the steps to create a simple form with it, and share a bit about how we built it.

Why yet another form package?

At Vazco, we’ve been using Meteor for almost four years. About two years ago we decided to replace Blaze with React for all new projects. During the transition we stumbled upon a problem: there was no good alternative to AutoForm in React. Sure, there were some React components to build forms, or a few community efforts to recreate AutoForm using React, but none of them was good enough for us.

This is where uniforms come in — we decided to build a package that would be easy to use in simple scenarios and powerful enough to support even complex cases.

uniforms logo

Radosław Miernik lead the project and created not only a great package but also a wonderful community around it. As a result, uniforms is now in the top 10 popular React forms packages on GitHub, with over 200 stars and 4000 downloads per month in npm.

What does`uniforms` offer?

At the high level,uniforms is a set of React libraries for building forms. It was created with Meteor in mind but doesn’t depend on it, so you can use it in any React app.

Out of the box, uniforms lets you:

  • Auto-generate forms based on a given schema
  • Use popular CSS frameworks thanks to the wide range of themes
  • Easily tweak form layouts to better fit with your UI
  • Create custom fields with just one line
  • Validate forms inline and asynchronously

uniforms is built in a modular way, as a set of packages. The core uniforms package is the heart of everything and contains logic to handle schemas, validation and processing.

Support for GraphQL, SimpleSchema v.1 and v.2 is built in, but you can use any schema — all you have to do is to write a small wrapper around it.

To render forms, you’ll also need a theme package. There are out-of-the-box themes for popular CSS frameworks (AntD, Bootstrap3, Bootstrap4, Material UI and Semantic UI) or you can use a plain HTML theme and style it however you like. If you want, you can also create new themes to better suit your needs; it’s fairly easy. Some of the popular themes are created and maintained by the community.

Let’s create a simple form

In this example, I’ll assume that you already have a working Meteor app using React as a frontend (if not, please see this example app).
To use uniforms, you need to add select packages to the project. I’ll use Semantic, but it could be any theme, or the unstyled version for plain HTML.

meteor npm install --save uniforms
meteor npm install --save uniforms-semantic # or any other theme

This example will make use of SimpleSchema (a very popular schema in Meteor community), but remember that it could be any supported schema, including GraphQL.

When you have a schema (and you usually already have them in your project anyway) all you have to do is to render the form. The simplest, yet very powerful, way is to use the AutoForm component from uniforms:

This will cover rendering all fields from your schema (based on the type in the schema), validation etc. As a result you’ll get something like this:

SimpleForm.jsx in action. Please note that Status field is a select field.

Of course, you have full control over how the form is rendered.
Let’s say you want to change layout and order of the fields (mixing it with other custom components in the process), use longer input for the content and show status as radio buttons, rather than a select.
You can do it right in your React component, without touching the schema:

The result is a more customized form:

Please note how validation error dynamically change from “Content is required” to “Content must be at least 10 characters” when form data change.

Right now all that’s left to do is call your backend with either Meteor.call, a GraphQL mutation or any other way that’s comfortable.

If you’re interested, the snippets above come from an example app.
You’re welcome to clone it and play with it yourself.

Online playground with live preview

You can also try uniforms online demo playground, where you can mix’n’match schemas, themes and different settings to view live results right in your browser.

Simply go to uniforms.tools and fiddle around.

Under the hood

There are few interesting things about how uniforms was built.

The codebase is organized in a multi-package repository managed by Lerna, so that the core and all the themes are released in sync, and we’re treating semantic versioning seriously. It’s also worth mentioning that all the packages have 100% test coverage.

There’s also a very interesting class-based inheritance concept for forms. Basically, there are a few types of forms with different capabilities. Most of the time you’ll be using either AutoForm or ValidatedForm, but there are quite a few more to choose from:

uniforms form inheritance model

So what’s so special about it? I think that Radek, the author of the concept, will explain it better:

If you are not familiar with concept of HOC, read one of many posts about them first.
I’m sure you’ve read at least one of Why ES6 classes are bad or class considered harmful posts. I’ve read them too, so why is uniforms using classes? Well, it’s all about the complexity.
Screenshot of React DevTools when lots of HOC’s are applied to a component.
I wanted to achieve the same functionality as with multiple HOCs, but within one component. To be honest, readability is more important than performance. In short, I’ve reached (more or less) traits with ES6 clasess. The result?
AutoValidatedQuickSemanticForm (using 5 “traits”) viewed in React DevTools.

While it’s not a universal approach that will work in every situation, using it in uniforms allows us to deliver clean-looking components while keeping extendability and separation of concerns.

Plans for the future

At Vazco we’re using uniforms in all our production apps, so it’s not going away anytime soon. We received a warm reception from the community, and a few companies aside from us have already already adopted it (not counting individual developers).

Radosław Miernik is working on the project making it better every day.
You can check the roadmap on GitHub. I can give you a sneak peek that a version 2.0 is coming soon. It will be almost 100% backward compatible, so you don’t have to worry about breaking changes. The most notable feature will be a performance boost at the cost of the support for older React versions.

Try uniforms out for yourself and let us know what you think!

vazco/uniforms


Managing forms in a Meteor/React project with uniforms was originally published in Meteor Blog on Medium, where people are continuing the conversation by highlighting and responding to this story.


Easily restore prior versions in Galaxy

$
0
0

You can now see version history, build status, and more at a glance

Each time a developer deploys to Galaxy, it creates a new version of their app. Galaxy then attempts to build and run this new version. Unfortunately, mistakes happen. Sometimes, broken app code is deployed or a bug only turns up after deploying. Sometimes, the latest version doesn’t even run.

Usually the simplest way to deal with a bad deploy is to go back to an older working version. In the past, Galaxy customers needed to check out the source code from the old version, re-deploy it from scratch, and wait for Galaxy to build a new image from the old code. This was slow and manual, and impossible if you hadn’t kept track of what version control commit you’d deployed from. For all these reasons, developers using Galaxy have told us they wanted to be able to quickly and easily restore a known working version, and that’s exactly what we’re releasing today!

Meteor Galaxy now allows you to simply choose a working version and click to restore.

The new feature comes as part of a new Versions tab we’re adding to the interface. Developers will now be able to access a versions page which will allow them to better understand an app’s version history.

The new versions page gives developers a snapshot of information for each deployed app version.

Each row displays a version’s last activation date, deployer, and build status, so you know exactly which versions failed and who deployed which version at a glance. A flag on the side indicates settings have changed between versions, while the row of the currently active version will be highlighted green.

You can now also easily see settings for past versions. Clicking the row will display more information about a version, showing settings, initial deployment date, and the restore options.

If settings differ between the current version and the version being shown, a warning will appear when attempting to restore, just so you have a heads up! This means you won’t accidentally restore settings with outdated information such as an old database password or missing environment variables.

The version page also displays live updates, so users can see a new version being deployed and build status being updated in real time.

Looking to the future, we’re excited about adding more information to this page that will be helpful to developers, such as incorporating the bundle visualizer now available in Meteor 1.5 and the ability to compare settings. If you have any ideas, as always, we’d love to hear them!

Klaire studies Computer Science at Yale and is joining us for the summer as an intern at Meteor. Be sure to follow along with her work on Twitter!


Easily restore prior versions in Galaxy was originally published in Meteor Blog on Medium, where people are continuing the conversation by highlighting and responding to this story.

Announcing Meteor 1.5.1

$
0
0

Easier bundle visualization, server-side rendering and Node.js security updates

We’re pleased to announce the release of Meteor 1.5.1 and some exciting features that came with it!

Though Meteor 1.5 was a relatively large release, and was received with much fanfare throughout the community, from a development standpoint it contained relatively few breaking changes and caused remarkably few new bug reports. This stability and ease of updating was due to the excellent and thorough feedback we received from a legion of developers during the 1.5 beta process. If your development team hasn’t become involved in testing pre-release versions of Meteor, please consider lending a hand by following Meteor release pull requests. Meteor 1.5.2 is coming soon and Meteor 1.6 (with Node.js 8) is in the works too!

The most pressing reason to release Meteor 1.5.1 was due to vulnerabilities in Node.js announced in July by the Node.js Foundation; however, there are many exciting improvements that we don’t want to gloss over! But first…

How to upgrade

To update an existing app to Meteor 1.5.1, simply run meteor update in any Meteor application directory.

As a reminder, make sure your application’s .meteor directory is committed to your version-control system (e.g. Git, Subversion, etc.) so it’s easy to roll-back if you ever encounter problems during any upgrade.

Server-side rendering

Meteor 1.5.1 comes with Meteor’s first implementation of a server-side rendering package called server-render.

The first content delivered to the browser after an HTTP request is included within the response to that request. In Meteor we generally call it the “boilerplate” but this is the content which is visible when doing a “View Source” in the browser.

In a Meteor app, the boilerplate includes everything necessary to bootstrap an application and load the rest of the assets including script tags for the Meteor JavaScript app bundle and remote libraries, CSS stylesheets, an HTML <head> tag with various metadata (page <title>, etc.) and an HTML <body> tag which acts as a target for the rest of the content to be rendered into programmatically.

For some applications, rendering additional content into the initial server response HTML can be important. For example, some apps may see performance gains by having particular HTML structure already present in the initial server response and others may need more control over what’s rendered for SEO reasons.

Previously, the only way to control the contents of the boilerplate was by setting request.dynamicHead or request.dynamicBody from the connect handlers on WebAppInternals, and these techniques provided no hooks for interacting with existing static HTML rendered by packages like static-html (a common alternative to blaze-html-templates for non-Blaze apps).

The new server-render package exposes an onPageLoad method which accepts a callback which is called at the appropriate time during the request. The lone argument to callback is a “sink” equipped with various facilities for modifying the initial HTTP response including appendToHead, appendToBody, appendToElementById and renderIntoElementById. Additionally, the callback can return a Promise if it needs to do additional work asynchronously, and the response will be rendered when the Promise is eventually resolved.

For more information on this exciting new feature check out the docs for server-render.

Easier bundle visualization

One of the most popular new features in Meteor 1.5 was the bundle-visualizer package, which allowed developers to see exactly what was in their initial JavaScript bundles. This feature was so exciting and useful that most Meteor developers didn’t mind (much) that using the initial version was pretty awkward: in addition to passing the --production option to simulate a production build (for realistic bundle analysis), it was necessary to run meteor add bundle-visualizer and then remember to meteor remove bundle-visualizer before deploying to production.

This process has been significantly improved in Meteor 1.5.1, thanks to a new --extra-packages option which includes additional packages for a single execution of meteor only. Instead of the extra steps above, it’s now possible to simply run:

meteor --extra-packages bundle-visualizer --production

This feature supports any Meteor package and also supports version constraints (i.e. package-name@x.y.z), so you can add or override a specific package temporarily. This is thanks to the great work in pull request #8769 from community contributor Michał Powaga.

Pub/Sub improvements

The publication and subscription portion of Meteor is one of the most time-tested and feature-complete portions of Meteor; however, it hasn’t seen much love in recent versions.

Meteor 1.5.1 brought both bug fixes and feature improvements:

  • Meteor.userId() and Meteor.user() can now be used in publications whereas previously it was necessary to use this.userId. This usage is much more consistent with other parts of Meteor.
  • The this.onStop callback in a publication is now run with the publication’s this context for a consistent publication environment.
  • The this.onReady callback in a subscription is now fired consistently during a re-subscription. Previously, it was only called if the arguments were different but this makes the behavior more intuitive. This could be a breaking change for a small percentage of applications, so please consult the version history for more information!
  • Method calls (i.e. Meteor.call(...)) which are called from publications will now inherit the this.connection from the publication in order to allow the examination of the subscribed client’s connection properties.

Thanks to Mitar for championing these improvements!

Other notable changes

  • ReactiveDict now supports the setting of an initial value upon instantiation (PR #8654, thanks to Simon Fridlund):
const dict = new ReactiveDict('dataLookup', { item1: 'val' });
  • The upsert behavior inminimongo and mongo now complies with the behavior present in Mongo v2.6 or higher. (PR #8815, thanks to Seba Kerckhof)
  • accounts-facebook has been updated to use Facebook API v2.9 following the deprecation of v2.3 earlier this month. (PR #8858)
  • standard-minifier-js will now replace any process.env.NODE_ENV expressions with a string literal (e.g. "development" or "production") when minifying, which should alleviate the problem of React Dev Tools alerting that an incorrect build of React was being used. (PR #8786)

Looking forward

We’re sure there will be some other routine and incremental updates in Meteor 1.5.2, and Meteor 1.6 is sure to be one of the best updates we’ve seen in a while. With each new release, we continue to align Meteor with the latest and greatest technology in the JavaScript community. Be sure to follow those pull requests to see what’s coming next!

If you’re interested in getting involved in Meteor development, the best way to start is by reading our Development.md guide.

Lastly, please don’t forget to show your support for our awesome community members who help make all this progress possible. Aside from the mentions above, we’d like to give a heartfelt shout-out to Hugh Willson for all of his tireless and amazing work on the project and in the community. 👏


Announcing Meteor 1.5.1 was originally published in Meteor Blog on Medium, where people are continuing the conversation by highlighting and responding to this story.

Download your deployed Galaxy apps with one click

$
0
0

You can now download a built archive of every deployed version of your app, directly from your app’s “versions” tab. Just select the version you’d like to download and click the “download” button.

Note that this isn’t your app’s original source code (which is never uploaded to Galaxy), so this isn’t a replacement for using a version control system for your code; it’s the built version, which has a different filesystem layout and may have client code minified for production.

You can use this feature to inspect the contents of different deployed versions, and also recover versions of your code you have deployed in the past. Together with the recently released ability to revert to previous versions, developers now have a lot more insight and control into application versions on Galaxy!


Download your deployed Galaxy apps with one click was originally published in Meteor Blog on Medium, where people are continuing the conversation by highlighting and responding to this story.

Reify: Meteor’s evolving JavaScript module compiler

$
0
0

How it works and where it’s going next

Reify working its magic in Node 4.8.4

On the surface, Meteor supports the same ECMAScript import and export syntax as many other web frameworks, bundlers, and build tools. Like most of those projects, we too use Babel to configure and run a set of syntax transformations that turn modern JavaScript into code that works in all browsers. Babel is a fantastic tool, and Meteor relies heavily on it.

However, the code Meteor generates for import and export declarations differs radically from what other tools produce, thanks to a special compiler called Reify that we developed and first shipped in Meteor 1.3.3, back in June 2016. This unique approach has been tested and proven in tens of thousands of Meteor apps over those thirteen months, and we believe the benefits are worth understanding. Even if the code you end up writing looks the same as anyone else’s ECMAScript, it will compile faster, behave more like natively-supported modules, and be easier to debug.

This post begins by explaining some subtle details of how import and export declarations are supposed to behave, then explains how Babel works within difficult constraints to achieve those requirements with its popular babel-plugin-transform-es2015-modules-commonjs plugin, then shows how Reify improves on that developer experience, and concludes with some exciting news about the future of the Reify compiler.

What’s so tricky about import and export?

If you’re not already an expert on the differences between ECMAScript modules and the module systems that came before, such as the CommonJS system used by Node, I would recommend watching this detailed talk that I gave at EmpireNode 2015, in which I explain how import and export build on the successes of CommonJS require and exports, while also solving some of CommonJS’s thorniest problems.

What I want to highlight in this post is the concept of immutable live bindings, a subtle yet critical feature that enables imported symbols to remain up-to-date with export declarations in other modules. In particular, live bindings allow ECMAScript modules to cope gracefully with circular dependencies. However, as you will see later in this post, simulating live bindings faithfully is one of the most challenging parts of implementing a compiler for import and export declarations.

If live bindings are already familiar to you, feel free to skim or skip the rest of this section. If not, keep reading!

When you write an import declaration such as

import increment, { value } from "./some/module";

it’s important to realize that the imported symbols, value and increment, are not ordinary variables. Instead, you should think of them as reflections of variables that were declared in ./some/module, made visible to the current module. That’s what we mean when we say the import declaration creates bindings for value and increment, as opposed to declaring new variables that happen to hold the same values.

This sharing of declarations between files is a concept that did not exist in JavaScript before the specification of modules, so you’re not alone if it seems strange the first time you hear about it.

Here’s how ./some/module might declare and export value and increment:

// Export `value` by name, hence the curly braces to import it.
export let value = 1234;
// Export `increment` as the default export, hence no braces.
export default function increment(by) {
value += by;
}

We say the imported bindings are live because the exporting module has the ability to change their values at any time, and those changes will be reflected immediately by bindings in other modules.

Suppose we add the following code after the import declaration:

import increment, { value } from "./some/module";
console.log(value); // 1234
increment(1111);
console.log(value); // 2345

In this example, the importing module is indirectly responsible for changing value by calling increment(1111), but that’s possible only because ./some/module exported the increment function. The implementation of increment is still controlled by ./some/module, so it’s only at the whim of ./some/module that value can be updated in this way.

We say the live bindings are immutable because the importing module is forbidden from assigning anything to them directly. In other words, the following code throws an error much like assigning to a const variable:

import { value } from "./some/module";
value += 1111; // Error!

As we saw above, ./some/module can change the value of value, or even export a function like increment that allows other modules to influence value’s value. So value is not exactly constant, since its value might change over time. The binding simply isn’t mutable (that is, able to be mutated) on the importing side.

So there you have it: import declarations create immutable live bindings, which allows imported symbols to remain up-to-date with export declarations in other modules.

If you found this explanation of live bindings confusing or inadequate, here’s a great post by Axel Rauschmayer on the same topic: http://2ality.com/2015/07/es6-module-exports.html

Meteor ❤ Babel

Before getting into the details of how Babel’s module compiler differs from the Reify compiler used by Meteor, I want to make something perfectly clear: this blog post is not about finding fault with Babel, or even with the way Babel compiles modules by default.

Meteor depends heavily on the Babel toolchain, and uses many Babel plugins that have nothing to do with modules. In fact, if you want to get really pedantic about it, we still use the babel-plugin-transform-es2015-modules-commonjs plugin to clean up import declarations inserted by other Babel plugins, especially babel-plugin-transform-runtime.

Triumphant blog posts that pretend to invalidate (or conveniently ignore) their competitor’s technologies are my least favorite part of the JavaScript ecosystem these days. The maintainers of Babel are absolutely not Meteor’s competitors. I myself am a frequent Babel contributor. If you get a boastful tone from this post, then I did a bad job of writing it, or maybe you’ve been primed to expect competition where there doesn’t have to be any.

I hope that I leave you with a renewed appreciation for the problems that Babel has to solve, as well as a working understanding of how Meteor approaches those problems in its own way.

How Babel compiles import and export

By default, if you’re using babel-preset-es2015, Babel will compile import and export syntax using a plugin called babel-plugin-transform-es2015-modules-commonjs. The goal of this plugin is to translate ECMAScript module syntax into code that uses CommonJS require and exports. Unfortunately for Babel, CommonJS is implemented in a wide variety of different JavaScript environments, each with a slightly different flavor: Node may be the biggest driver of CommonJS usage, but Babel also has to generate code that works in bundles built by Browserify, Webpack, FuseBox, Meteor, et cetera, etc, &c.

To get an intuition for how that translation works, let’s revisit our earlier value and increment example:

export let value = 1234;
export default function increment(by) {
value += by;
}

After compilation with babel-plugin-transform-es2015-modules-commonjs, this code becomes:

Object.defineProperty(exports, "__esModule", {
value: true
});
exports.default = increment;
var value = exports.value = 1234;
function increment(by) {
exports.value = value += by;
}

Notice how the local variables value and increment have to be copied over to the exports object, and that relationship must be carefully maintained whenever the variables are reassigned.

To see what happens on the importing side, let’s revisit our earlier example:

import increment, { value } from "./some/module";
console.log(value); // 1234
increment(1111);
console.log(value); // 2345

After compilation, this code becomes:

var _module = require("./some/module");
var _module2 = _interopRequireDefault(_module);
function _interopRequireDefault(obj) {
return obj && obj.__esModule ? obj : { default: obj };
}
console.log(_module.value); // 1234
(0, _module2.default)(1111);
console.log(_module.value); // 2345

Notice how Babel rewrites references to value and increment as _module.value and _module2.default, which allows those references to remain up-to-date with the current properties of the exports object. This rewriting of references is how the Babel-generated code achieves live bindings, since every time you access _module.value you get the latest value of the property from the exports object of ./some/module.

The downside is that the generated code is harder to debug in the Node REPL or your browser’s dev tools, since the value and increment symbols have become properties of _module and _module2. You can sprinkle calls to console.log(value) in the original code, so that Babel can rewrite both the import declaration and the value references in the same compilation pass, but Babel won’t be able to compile console.log(value) correctly at a later time, because the import declaration is no longer available.

Also, if you use the handy as syntax to rename an imported binding—

import { value as aBetterName } from “./some/module";

you won’t find aBetterName mentioned anywhere in the generated code. Instead, it gets rewritten to _module.value, since that’s what ./some/module decided to name it, and that’s just how the rewriting works. Both of these behaviors are gotchas that you can internalize with some effort, but they trip up almost everyone the first few times.

In addition to making debugging harder, this rewriting strategy requires the compiler plugin to traverse the entire abstract syntax tree, since references to the imported symbols could appear anywhere in the module, which makes babel-plugin-transform-es2015-modules-commonjs relatively expensive, as Babel plugins go.

The big challenge that Babel solves

Because babel-plugin-transform-es2015-modules-commonjs strives to generate code that works everywhere, it can’t make any assumptions that aren’t true in all of the environments it targets. In practice, serving the needs of so many different environments has a number of subtle, sometimes unfortunate consequences. To name just a few:

  • The CommonJS module object may not be available at all, may not inherit from a common Module.prototype, or may not provide useful information like module.id or module.parent.
  • Module identifier strings like "./some/module" may be replaced by numbers (as in Browserify and Webpack), so require(id) and require.resolve(id) won’t work at runtime if the value of id was unknown at build time.
  • Babel can’t assume that all modules have been compiled by Babel, so cooperation between the compiler and the runtime is usually out of the question. The exports.__esModule property is one rare exception, born of absolute necessity.
  • CommonJS modules that reassign module.exports require shims like the _interopRequireDefault helper we saw above.
  • A module that uses export declarations might be imported by other modules using require, so the exports object must always be kept up-to-date with exported local variables.

These constraints restrict the design space within which Babel must operate, so it is hardly obvious that babel-plugin-transform-es2015-modules-commonjs could or should work any other way.

If the complexity of this situation makes you think that JavaScript should have a native module system already, you are not alone! These multi-environment acrobatics are exactly what happens when there is no preexisting specification to rely upon. However, that makes what Babel is doing all the more important, because this careful synthesis is the only way to get all those implementations to adopt the new standard.

How Reify compiles import and export

It’s a testament to the flexibility of Babel that Meteor can simply replace the babel-plugin-transform-es2015-modules-commonjs plugin with our own custom plugin called babel-plugin-transform-es2015-modules-reify. If you ignore the details of how this plugin works, then that’s all there is to it. Hooray for abstractions!

Compared to Babel and babel-plugin-transform-es2015-modules-commonjs, Reify’s job is relatively easy, because Reify can make stronger assumptions about the runtime module system that it’s targeting. Specifically, Reify was designed with Node and Meteor in mind. It can be made to work in other environments, but the decision to target only those implementations of CommonJS has been liberating, to say the least.

The value of these assumptions should become clearer with an example. Let’s start on the importing side. After compilation with Reify,

import increment, { value } from "./some/module";
console.log(value); // 1234
increment(1111);
console.log(value); // 2345

becomes

let increment, value;
module.watch(require("./some/module"), {
default(v) { increment = v; },
value(v) { value = v; }
});
console.log(value); // 1234
increment(1111);
console.log(value); // 2345

The module.watch API uses require to import the module, then registers a set of callback functions to be called whenever an export of the given name changes value. Most exports change value only once, when first initialized by the exporting module. However, the first initialization might happen some time after the require call returns, in cases of circular imports.

The module.watch method is defined on a shared Module.prototype object, which exists in Node (conveniently) and Meteor (deliberately), but not in most other CommonJS environments (unfortunately).

That, in a nutshell, is how Reify achieves live bindings: by calling callback functions to update local variables whenever new values are exported.

On the exporting side,

export let value = 1234;
export default function increment(by) {
value += by;
}

becomes

module.export({
value: () => value,
default: () => increment
});
let value = 1234;
function increment(by) {
module.runSetters(value += by);
}

Here we see two more Module.prototype methods at work: Module.prototype.export and Module.prototype.runSetters.

The module.export API (not to be confused with the CommonJS module.exports object!) registers callback functions that tell the module system how to find the current value of every export. Whenever a module finishes evaluating, or an exported variable gets updated, the generated code calls module.runSetters, which retrieves the latest values of each export, then calls any callbacks registered with module.watch in other modules, reporting any new (or changed) exported values.

Making sure that module.runSetters gets called whenever a module finishes evaluating, even if that module was not compiled by Reify (e.g. built-in Node modules like fs and http), requires some cooperation from the runtime module system. I haven’t found a way to make that work using other bundling tools like Webpack or Browserify, though I have some ideas. For now, it’s definitely easiest if you’re using Node or Meteor.

These three APIs (module.watch, module.export, and module.runSetters) have proven extremely versatile. For example, re-exporting symbols from another module is an easy job for module.watch:

export { a, b as c } from "module";

becomes

module.watch(require("module"), {
a(v) { exports.a = v; },
b(v) { exports.c = v; }
});

Reify can even detect changes to exported variables that occur as a result of eval, by simply wrapping eval(...) expressions with module.runSetters:

export let value = 0;

function runCommand(command) {
return eval(command);
}

runCommand("value = 1234");

becomes

module.export({
value: () => value
});
let value = 0;

function runCommand(command) {
return module.runSetters(eval(command));
}

runCommand("value = 1234");

If you’re curious how Reify handles all the different kinds of import and export syntax, your best resource is the README.md.

What’s next

Meteor Development Group, as a company and as a group of people, deeply values collaborative working relationships with other companies and people. Working with others broadens our impact as a small startup, and makes our jobs that much more fun.

For the past several months, Reify has benefitted enormously from the involvement of John-David Dalton, of lodash fame. His questions, ideas, commits, and legendary zeal for performance optimization have made Reify significantly smaller, faster, more standards-compliant, and easier to use outside of Meteor.

In fact, that’s exactly what he was hoping to do. Using the technologies described in this post, JDD has built a module loader for Node 4+ that allows any npm package to use ECMAScript module syntax without an explicit compilation step. Yes, you read that correctly—the Reify compiler is fast enough to run completely on-the-fly, even after npm packages are installed, rather than needing to run in a build step before publishing. Of course the compiled code is cached on disk, and you can even publish your cache to npm if you like, but that’s not strictly necessary.

Why is this so important? It’s important because it means npm packages can finally begin publishing ECMAScript modules directly to npm, without also having to publish a compiled version, and anyone using Node 4 or later will be able to consume those packages without running a build tool. Tools that understand module syntax, such as Rollup, will be able to consume this module code directly, without having to look for alternate entry point modules. If this plan works as well as we hope, the next version of lodash, v5, will be published purely as ECMAScript modules.

John-David Dalton’s @std/esm package differs slightly from Reify in its commitment to standards compliance. Whereas Reify is essentially a way of using ECMAScript module syntax within CommonJS modules, the @std/esm loader goes the extra mile to hide CommonJS variables like require, exports, and module, and Node variables like __dirname and __filename by default. Also, in keeping with the plans of the Node team, you’ll have to give your modules an .mjs file extension, though that behavior can be toggled with an option in package.json. Several other experimental behaviors are configurable, too.

Final thanks

Special thanks are due to Bradley Farias, a member of the Node team who is currently working on the native implementation of ECMAScript modules, for providing lots of technical feedback on this project, which has been vital to keeping the plans for @std/esm aligned with those of the Node team.

Finally, we owe a huge debt to the Meteor community for using the Reify compiler in their applications over the past year, and providing extensive feedback in the form of GitHub issues. Your testing and validation are what allowed this project to grow beyond the immediate Meteor ecosystem, and I expect you will continue to benefit from what we learn out there.


Reify: Meteor’s evolving JavaScript module compiler was originally published in Meteor Blog on Medium, where people are continuing the conversation by highlighting and responding to this story.

Safer app deploys on Galaxy

$
0
0

Galaxy now runs health checks before activating new versions

A few weeks ago, we announced the version restore feature, which allows you to easily reactivate a previous version of your app in Galaxy. This was especially handy in the case of faulty deploys, but we’re excited to announce new precautions that will help prevent a bad deploy from ever going live in the first place! Meteor Galaxy will now run health checks on a deploying version before activating it.

How it works

When you upload a new version that builds successfully, Galaxy will begin monitoring containers launched for this new version. Galaxy will wait a minimum of 10 minutes for the user’s desired count of containers to be running and healthy.

If there aren’t enough healthy containers by the deadline, Galaxy will report a failed deploy and return to maintaining and launching containers for the last healthy version. If the app was previously stopped or did not have a healthy previous version, Galaxy will automatically stop the app.

With these changes, Galaxy will now be able to track deploy completions and generate activities accordingly. This will give users more insight into the deployment process, allowing them to see exactly when a deploy has finished and whether or not it was successful.

We hope this is helpful! As always, let us know if you have any feedback about the version restore feature.

Klaire studies Computer Science at Yale and is joining us for the summer as an intern at Meteor. Be sure to follow along with her work on Twitter!


Safer app deploys on Galaxy was originally published in Meteor Blog on Medium, where people are continuing the conversation by highlighting and responding to this story.

Announcing Meteor 1.5.2

$
0
0

Node.js V8 bug-fix, improved development reliability, Cordova 7, and more

With over 40 pull requests under its belt, Meteor 1.5.2 is finally here! New features, routine dependency updates and a number of bug fixes (including a sneaky garbage collection bug in Node.js V8), all come together to make Meteor 1.5.2 a worthwhile update for any Meteor user! Let’s get down to it.

How to upgrade

To update an existing app to Meteor 1.5.2, simply run meteor update in any Meteor application directory.

As a reminder, make sure your application’s .meteor directory is committed to your version-control system (e.g. Git, Subversion, etc.) so it’s easy to roll back if you encounter problems during any upgrade.

Potentially breaking changes

Though we strive to avoid breaking changes as much as possible, some can’t be avoided. These changes are relatively low-impact, so you may not even notice them, but they are worth mentioning just to be super clear. For more information on these changes, check the full version history.

Dropped support for MongoDB 2.4

In order to maintain compatibility with newer versions of MongoDB and its driver, we’ve dropped support for version 2.4. MongoDB maintains a list of supported versions and MongoDB 2.4 officially reached “End of Life” in March 2016. All major database vendors have long since discontinued 2.4, so the impact of this change should be minimal.

Re-exporting a module’s default export

If you have any wrapper modules that re-export another module’s exports using export * from "./wrapped/module", and the wrapped module has a default export that you want to be included, you should now explicitly re-export default using a second declaration:

export * from "./wrapped/module";
export { default } from "./wrapped/module";

“Bare” files are evaluated differently

Files contained by client/compatibility/ directories or added with api.addFiles(files, ..., { bare: true }), are now evaluated before importing modules with require, which may be a breaking change if you depend on the interleaving of bare files with eager module evaluation.

Updates and stability improvements

Node.js V8 garbage collection patch

In the past, we’ve occasionally shipped our own version of Node.js to include bug fixes, like this one in Node’s pre-packaged version of npm. Thankfully, for more than a year and a half (since Meteor 1.3.3), we’ve been able to ship the official tarball straight from the Node.js project.

Of course, while we enjoy not having to compile our own Node.js, an unfortunate garbage collection bug in the underlying V8 engine has created a valid reason for us to ship a patched version, as without it we’ve noticed unexpected segmentation faults in our CircleCI builds.

If you’re interested in the nitty-gritty details, you can check out the patch that we submitted to Node.js. Good news: the pull request has been merged and is slated for release in Node 4.8.5!

Thanks to the seamless integration of Node.js and Meteor versions, there is nothing additional you’ll need to do as a Meteor developer besides update to 1.5.2. As soon the new Node.js version ships (which can take a few weeks to a few months) we will resume bundling the official version of Node.js in a subsequent version of Meteor, likely 1.5.3.

The end of endless reloads

As a result of the change in Meteor 1.5.1, which drastically reduced the number of open file descriptors, we were able to home in on another problem that was less pronounced before but occasionally caused endless reloads during development for some users.

With the fix, Meteor no longer relies on file watchers to invalidate its file system cache when control files like .meteor/versions are modified by the build process.

Version bumps

The most substantial version bump award for this release goes to Cordova, which graduated from 6.x to 7.0.1. There shouldn’t be any breaking changes from the Meteor perspective, but those interested in what this means for Cordova should consult the Cordova blog post. (And thanks to skirunman for making this happen!) Looking forward, in Meteor 1.6, we will no longer bundle Cordova directly into Meteor releases (thanks to this pull request), but will instead install it automatically for those developers who use it. This should substantially reduce the download size of Meteor releases.

We’ve bumped minor versions of other dependencies to fix some more obscure bugs, but nothing that should be a cause for concern. Details can be found in the History.md for the release!

Ease for Galaxy

We’ve addressed some issues in the Galaxy deployment process that caused meteor deploy to stall for unclear reasons, especially when deploying from a continuous integration (CI) environment like Travis or Circle. The root of the problem turned out to be authentication errors that were never reported to the developer.

Furthermore, we’ve made changes which will ensure that Galaxy is ready for the major Node.js 8 and npm 5 versions bump in the upcoming Meteor 1.6.

Features

We don’t pack a lot of features into a point release like 1.5.2, but some things are too good to wait for, and we’re eager to get them into your hands!

See your package dependency tree

If you’ve ever scratched your head about some of the dependencies that you’ve seen trickle into your .meteor/versions file, then you’ll be thrilled by one of our recent community contributions. (Thanks, Stephen Darnell!)

It’s now possible to pass a --tree flag to the meteor list command to get a full, hierarchical dependency tree, much like the output of npm ls:

$ meteor list --tree
meteor-base@1.1.0
├─┬ ddp@1.3.0
│ ├─┬ ddp-client@2.1.0
│ │ ├── check@1.2.5
│ │ ├─┬ ddp-common@1.2.9
. . . . snipped . . . .

Remove more of the bits you might not need

As React developers will be sure to tell you, it’s long been possible to remove Blaze from the client bundle. However, it was still included on the server side due to a dependency from the boilerplate-generator package, which is responsible for rendering the initial HTML used to bootstrap the rest of the application. Since it was server-side only, this dependency wasn’t as important to remove, but thanks to the great work of Steven Hao, a Meteor summer intern, it’s now possible to remove it on the server as well.

For developers who are using Meteor as just a build tool, applications which don’t require the mongo package will no longer start the MongoDB server in development, resulting in faster start times and lower resource usage. (Thanks, Simon Fridlund!)

Roadmap updates and Meteor 1.6

If you haven’t already noticed, the Meteor Roadmap recently got some exciting near-term plans added to it, and we can’t wait to bring you all the new developments!

If you’re interested in helping define the future of Meteor, be sure to let us know what you’re most excited about by voting with emotes (👍) on feature requests, and adding productive conversation where applicable. And if you’ve got time to help build features, the best way to start is by reading our Development.md guide — we’d love to review your pull requests!

And of course, don’t forget to follow exciting news on Meteor 1.6 by pressing “Subscribe” on the 1.6 pull request!


Announcing Meteor 1.5.2 was originally published in Meteor Blog on Medium, where people are continuing the conversation by highlighting and responding to this story.

Server-side rendering (SSR) in Meteor

$
0
0

Looking at Meteor’s implementation of SSR + a real-world example

This is a guest post from community member Julian Ćwirko, and was originally published on julian.io.

Not only is the Meteor platform is still alive, it’s constantly being improved! Meteor is becoming a more flexible and complete platform every day, despite proceeding at a slower pace than when the project was younger. For me, the most interesting improvement lately is Server-Side Rendering. In this post I’ll tell you why, and why I especially like it in Meteor.

What we’ll cover here:

  • Why is Server-Side Rendering (SSR) good to have, especially in Meteor?
  • How is it implemented in Meteor?
  • Real-world example in ready-to-use boilerplate

Why is Server-Side Rendering (SSR) good to have, especially in Meteor?

Some time ago, I wrote an article about why I keep coming back to Meteor. I shared that I use Meteor in projects that aren’t that demanding because of some of its limitations; I saw it as the most complete platform that’s very simple to start with. I still believe this is the best platform for fast prototyping, but with recent (and future) improvements I believe it has also become suitable for big apps.

It has ultra-simple deployment options, and the build system works automatically, which is why there are so many devs who like it. And now we have SSR on board along with a couple of other nice features like dynamic imports (but that’s topic for separate article).

Server-Side Rendering is a feature that’s always nice to have in smaller projects that are part apps and part websites, because your site will be accessible to all web crawlers out there and your SEO will shine. Of course Google bots should index your website anyway, but what about Facebook or Twitter bots, what about sharing materials on social services? I always had problems with that, even when building simple projects.

For that reason, having SSR on board with a simple configuration is something I like in every framework. Of course there will be many situations when you may choose not to use SSR because the benefits to not using it are greater: you may want a separated front-end and backend (different servers), or you may just not need it in the app because it will mostly be used internally, or all content and functionalities are available only by private access for logged-in users.

You may be thinking, “So how did it all work before SSR?” There are couple of options. SSR isn’t ultimately a significant improvement. You can implement some workarounds which are also very good: You can use services like Prerender.io, or you can use your own server that generates static websites and serves them for web crawlers only. This is just a matter of choosing what is most valuable in the app you’re building.

So, why do I like SSR in Meteor especially? Because this is the next missing puzzle piece in a very simple-to-start platform without significant configuration needed to get going. You can just focus on coding. With Meteor, I can get not only SSR, but the whole stack, up and running very quickly.

How is SSR implemented in Meteor?

This is the most interesting part of this article, so without further ado, let’s see what it looks like.

First of all, you need a new package called server-render, which needs to be added to your Meteor app. You can do this by writing in the terminal: meteor add server-render. Unlike the dynamic-import package, this one isn’t added when creating a new Meteor app. I think this is good; you’ll be able to decide and add it if only needed.

After you add the package, you need to be sure that your components will be accessible on both the server and client side. I use React, so this is very simple to achieve. (I am not sure how it looks with other view layers like Angular.) Later, you’ll see how I’ve got it structured in my simple boilerplate. I haven’t tested it yet, but the package should work with all modern front-end frameworks that can be integrated with Meteor. For now, let’s see what the API looks like.

So the server-render package exposes onPageLoadmethod, a callback function which is called with a sink object as parameter. Sink provides useful methods which allow you to modify the HTML that will be served from the server. Basically what we need to do on the server side is to render our main App component to a string using built-in React methods (the standard way of doing SSR with React) and then we can use sink.renderIntoElementById to put the whole HTML in proper place in the body. onPageLoad will always fire when it is needed, so the current source code of the page should be updated. You can use other methods from sink: you can append some elements to the head tag by, for example, using react-helmet on the server (which I’d strongly recommend). This had always been problematic, especially when you wanted to share your content on social services like Twitter or Facebook. In that case, you can now inject Open Graph tags and other meta tags so Facebook or Twitter bots will see them properly, which is very useful.

If you’re interested, you can find the full documentation. Now it’s time to jump into the real example, which is my simple boilerplate. Let’s see how SSR looks like there.

An example in ready-to-use boilerplate

Lately I’ve updated my Meteor boilerplate to be ready for SSR. It also uses Redux, so it’ll be a good opportunity to show how to use Redux and SSR together.

This is a pretty standard boilerplate based on the Meteor Guide, so the folders structure should be simple for every Meteor developer. It may look a little bit overwhelming, but that bunch of the extra code is because of the boilerplate and not because of server-side rendering. Let’s see what we have in there. I have client app initialization and server-side app initialization. I also share React routes and Redux actions and reducers between the server and client.

Let’s see what we have on the server side:

This is where all the magic happens. We need to wrap all the code inthe onPageLoad method just to be able to rerun it and generate new static HTML on every page request. Here we can create the initial state for our Redux store. Then we can create the store and prepare the main component. We use static router configuration here because on the server there isn’t browser history, etc. Another thing which needs to be done is putting the initial state into our static HTML code. We do this using sink.appendToBody method from server-render package. All main code is generated using React’s renderToString and then it is injected into the app div element using sink.renderIntoElementById.

Now let’s see what we have on the client side:

As you can see, I use Redux, so when using SSR I can get the initial state for the store on the server and pass it in the static generated HTML. This is recommended way. Here on the client side, I just get the initial state from a special object injected into the body. You’ll see how it’s done above. Then I create the Redux store with initial data and prepare standard main App component with routing. I use React Router 4 here. This is all you need on the client side for now.

What else can we do here? Of course, we could inject some meta tags, like Open Graph tags, or just a title and description for every page by using the react-helmet library. We’d use the Helmet.renderStatic method which returns data that then can be appended to the tag of our static document. This will give us different data for every page. We use the sink.appendToHead method to be able to do that.

That’s basically it! Having this API, we are able to configure SSR in a very simple way. This is another part of Meteor which makes the platform very nice to use for any developer. Let me know what you think and how you use it in your projects.

To sum up this article.

I just wanted to do some research on the newest SSR options in Meteor, and I must say that I like what I saw. You can always download and play with my boilerplate.

I think Meteor is going in the right direction. It is faster and uses more and more of the newest approaches to build processes. The potential Apollo integration also looks really good. The only things missing for me are: a more configurable and flexible build system and a more extendable accounts system decoupled from Meteor and Live Data (or at least more documentation on how to do that yourself). But otherwise I’m really happy with Meteor overall.

Have a cool project in mind? -> Get it touch at psd2Meteor — Meteor apps development!

Originally published at julian.io

Server-side (bacon) rendering. Responsibility for this terrible pun rests solely at the feet of this blog’s tasteless editors.

Server-side rendering (SSR) in Meteor was originally published in Meteor Blog on Medium, where people are continuing the conversation by highlighting and responding to this story.


What’s coming in Meteor 1.6

$
0
0

Node 8, npm 5, Mongo 3.4.5, lazy modules anywhere, advanced React features

Now that Meteor 1.5.2 has been released, it’s time to look forward to our next major release: Meteor 1.6. Given all the improvements that are coming, it was tempting to stamp this release as “Meteor 2.0,” but that would suggest there must be lots of breaking changes, and that upgrading is likely to be a difficult chore. Nothing could be further from the truth, as we remain firmly committed to backwards compatibility and a smooth meteor update experience. And yet, Meteor 1.6 will be an enormous leap forward.

Does this mean we’re only now turning our full attention to Meteor 1.6? Lol, no. In fact, we’ve been working on 1.6 in parallel with 1.5.x releases for about three months now, and we began exploring the possibility of shipping Meteor with Node 6 all the way back in April 2016, even before Meteor 1.5 was released. We’ve published 26 beta releases of Meteor 1.6 so far, and the pull request has more than 250 commits, with 41 community participants.

In other words, Meteor 1.6 is already remarkably stable, thoroughly tested, and well on its way to shipping. A number of Meteor developers have successfully deployed Meteor 1.6 apps to production, despite our disclaimers and caveats, which are steadily dwindling in number and seriousness. That choice is not hard to understand: the benefits already outweigh the risks.

How excited are we about Meteor 1.6? Whatever else we may say, the basic truth is that we’ve been using it ourselves for everything we possibly can, except for rare cases when we need to debug problems specific to a certain Node or npm version. After spending so much quality time with Meteor 1.6 and Node 8, it’s getting harder and harder to switch back to Meteor 1.5.

If you’re willing to help test these shiny new tools, you can run

meteor update --release 1.6-beta.26

in any existing application directory, or run

meteor create --release 1.6-beta.26 new-app

to create a new application using Meteor 1.6.

As a reminder, make sure your application’s .meteor directory is committed to your version-control system (e.g. Git, Subversion, etc.) so it’s easy to roll back if you encounter problems during any upgrade.

Node 8.4.0

Status: available since 1.6-beta.22.

The headline feature of Meteor 1.6 is a seamless upgrade from Node 4.8.4 to Node 8.4.0, the very latest version of Node. Although Node 8 will not officially attain LTS status until October, a full-stack framework like Meteor is uniquely equipped to deliver the experience as soon as possible, because we can smooth over any rough edges along the way. We were initially wary of skipping Node 6 entirely, but we couldn’t find any good reason to remain a step behind the times, and working with Node 8 has been thoroughly dreamy so far.

Ignition and TurboFan

Status: implemented by Node 8.3.0.

Node 8.3.0 was the first version of Node to use V8 6.0, which includes an all-new JavaScript interpreter (Ignition) and optimizing compiler (TurboFan).

Among many other performance benefits, this new JavaScript engine no longer penalizes “optimization killers” like try-catch blocks or certain usages of the arguments object. In other words, everything you thought you knew about V8 micro-optimizations is probably worth revisiting.

I’ll let Myles Borins introduce Node 8.3.0:

Node.js 8.3.0 is now available shipping with the Ignition + TurboFan execution pipeline

And I’ll let the V8 team explain Ignition and TurboFan in more detail:

Launching Ignition and TurboFan

Here are two reactions from actual Meteor developers who have been testing the latest Meteor 1.6 betas:

Some speak in numbers, others in doge.

Fewer Babel plugins on the server

Status: implemented since 1.6-beta.11.

Node 8 natively supports almost the entire ECMAScript 2017 standard, with the notable exception of module syntax (import and export). That means Meteor no longer needs to use nearly as many Babel plugins to compile your server-side code, so rebuild times should be that much faster.

Of course, we still have to compile module syntax, and you can read all about how we do that in our previous blog post:

Reify: Meteor’s evolving JavaScript module compiler

Among the most exciting new native features, async functions and await expressions no longer have to be compiled using Regenerator. As the original author of Regenerator, nothing could make me happier than to see it become obsolete.

Native debugging

Status: implemented since 1.6-beta.0.

I wasn’t kidding when I tweeted:

I was talking about a new implementation of the meteor debug command using Node 8’s Inspector, which allows debugging Node applications using a variety of debugger clients, including Chrome DevTools:

Debugging Node.js with Chrome DevTools

When you run meteor debug in an application directory, your application builds and starts up, and your server code is parsed and evaluated by Node. However, just before your server code begins executing, the debugger pauses at a convenient breakpoint, so you have time to connect your debugging client of choice and set breakpoints anywhere you like. This is much better than using the node --inspect-brk flag, since that stops too soon to set any useful breakpoints.

The most amazing benefit of the Node 8 inspector is that your code runs at full speed, so you don’t have to wait forever to hit that all-important breakpoint, and you don’t lose nearly as much time if you accidentally continue past the line of code where the trouble is occurring. This also means you can finally do realistic performance and memory profiling of your server-side code through the Chrome DevTools UI.

Even if your application is stuck in an infinite loop, you can still attach a debugger, pause execution, and debug the loop. This makes me very excited about the possibility of remotely debugging Galaxy containers that get stuck at 100% CPU usage.

HTTP/2

Status: wishlist.

Node 8.4.0 added a new built-in module called http2, which can be enabled by passing the --enable-http2 flag to node. This was a minor breaking change because there is already a widely-used package called http2 on npm.

Meteor will need some time to make the most of HTTP/2, but we are very excited to see it land among the Node core libraries.

Node v8.4.0 (Current) | Node.js

npm 5

Status: implemented since 1.6-beta.4.

It’s been an interesting year for npm clients. Once unrivaled as the tool of choice for installing npm packages, the npm command-line tool faced some serious competition starting last September from an innovative tool called yarn, which promised fast, reproducible installs based on yarn.lock files.

The popularity of yarn led Meteor to support meteor yarn in addition to meteor npm (though you had to meteor npm install --global yarn first, so npm still had an advantage). Our own Galaxy Server and Optics apps, which are built with Meteor, switched over to yarn soon after its release. The appeal was undeniable.

This competition was a good thing for JavaScript developers, first because yarn solved some long-standing problems with npm, and later because npm@5 responded by shipping its own implementation of some similar features, with package-lock.json files and automatic addition of npm install-ed packages to package.json.

Another interesting command-line tool called npx ships with npm@5, and just as Meteor supports meteor npm ... as a shorthand for running npm with the right version of node and appropriate environment variables, so too will Meteor 1.6 support meteor npx ... as a way of running Node scripts installed in node_modules/.bin directories.

Meteor is careful to remain agnostic about how you choose to populate your node_modules directories, so we fully expect that meteor npm and meteor yarn will remain equally good alternatives for that purpose.

As with bleeding-edge versions of Node, there have been a few hiccups as we’ve updated npm. For example, with npm@5.4.0, we noticed that executable file permissions were being stripped after npm package installation, due to a bug in the pacote@6.0.1 package. This bug was caught by our own regression tests, and already had an open pull request that seemed to fix the problem.

Meteor was able to validate the pull request by rebuilding our dev bundle with a custom version of pacote, which allowed us to continue using npm@5.4.0 without waiting for the next release of pacote:

Mongo 3.4.5

Status: planned.

What seemed at first like a routine upgrade to Mongo turned out to have a subtle gotcha: Mongo 3.4 no longer supports 32-bit platforms, which means Meteor will need to drop official support for 32-bit Linux, and add support for 64-bit Windows.

Although it is now possible to remove Mongo entirely from a Meteor application, Meteor apps still depend heavily on Mongo by default, and so we think it makes sense for us to follow the lead of Mongo’s system requirements.

If you are an active user of Meteor on 32-bit systems, now would be a great time to let us know how you feel about this transition.

Lazy modules without imports directories

Status: planned.

When Meteor 1.3 first introduced a module system based on CommonJS and ECMAScript module syntax, we had to provide a way for developers to migrate their apps from the old ways of loading code, whereby all files were evaluated eagerly during application startup.

The best solution at the time was to introduce a special imports directory to contain modules that should be loaded lazily (rather than eagerly), when first imported.

Most other Node applications work this way by default: every module is lazy, and therefore must be imported by another module, and evaluation starts with one “entry point” module (typically specified by the "main" field in package.json).

It should be possible for Meteor apps to opt into this behavior, and optionally get rid of their special imports directories. The mechanism for opting in will very likely involve putting something in your package.json file that specifies entry point modules for both client and server.

Support for advanced React features

Status: partially completed.

React is the most popular way to build UIs in JavaScript today, and a great companion to the rest of the features provided by Meteor. Meteor’s zero-configuration environment provides a great opportunity to make features which React apps depend on work out of the box. This includes features like:

  1. Automatic selection of development vs. production build of React modules (completed).
  2. Easy abstraction for isomorphic server-side rendering (ongoing).
    To get you excited, check the awesome example app built by James Baxley III, which was recently demoed at the ReactNYC Meetup: https://reactnyc.meteorapp.com/
  3. Integration of dynamic imports with server-side rendering (planned).
  4. Full support for optimized CSS-in-JS features of libraries like styled-components (completed).
  5. Easy creation of zero-configuration React-based Meteor apps via
    meteor create --react my-react-app (planned).

We think Meteor has a clear set of benefits compared to other popular React frameworks like Create React App (which does not support server-side rendering) and Next.js (which is much more opinionated about design choices like routing).

How to get involved

The best way to get involved in the development of Meteor 1.6 is to try updating an existing app, or creating a new one:

meteor update --release 1.6-beta.26 # in an existing app directory
meteor create --release 1.6-beta.26 new-app

If you have questions, feel free to ask them on the pull request, or file an issue on our issue tracker, and we will gladly help you triage your problems. Just remember to indicate clearly that you are using Meteor 1.6.

The more usage of Meteor 1.6 we can get during the beta testing process, the sooner we’ll have enough confidence to ship a release candidate, and then ultimately a final release.

Please bear in mind that meteor node ... and meteor npm ... can help ensure you’re using the right version of node and npm for your current application (according to .meteor/release)—a subtlety that is especially important when you’re working with multiple beta versions of Meteor, which may use slightly different versions of node and npm.

You can keep track of the latest release versions on our Releases page, and stay abreast of our longer-term vision by consulting our Roadmap.md document.

Once you give Meteor 1.6 a try, we think you’ll understand what we mean when we say it’s hard to switch back to earlier versions of Meteor.


What’s coming in Meteor 1.6 was originally published in Meteor Blog on Medium, where people are continuing the conversation by highlighting and responding to this story.

Galaxy’s Prerender service is upgrading to Chrome!

$
0
0

How to test your prerendered pages with the new Chrome engine

Many users of Galaxy take advantage of the built-in Prerender service to enable their JavaScript clients to be crawled by search engines. Prerender automatically renders and caches JavaScript apps and websites on Galaxy using an in-memory browser, and Galaxy returns those cached renderings when asked by a crawler.

Prerender currently uses a rendering engine based on PhantomJS. However, some of our users have reported that Prerender doesn’t work with their site — primarily due to PhantomJS’s lack of support for ES6 output. Luckily, our friends at Prerender have built a new rendering engine based on Chrome.

At the end of this month, we’ll upgrade all Galaxy apps to use the new Chrome rendering engine. Apps will gain this new ability automatically, with no additional action needed from users.

As with any major platform change, users should expect potential differences in the way Chrome renders their pages. For most apps, upgrading to Chrome should improve rendering speed and compatibility. But that might not be the case for all users. That’s why we’ve made it possible for Galaxy users to test how their app will render with the new engine, and choose to opt out of this engine on a per-app basis.

Testing your prerendered pages

In order to see how your app looks prerendered with the Chrome engine, use the following incantation. (Yes, it really is a single URL that looks like two different URLs smooshed together without a space before your URL’s “https”.)

curl -H 'x-prerender-browser: chrome' https://service.prerender.io/https://www.yoursite.com

To see the result from PhantomJS, do not pass the x-prerender-browser header.

Opting out of Chrome in Prerender

In the unlikely case that you need to remain with PhantomJS, the only option is to create your own Prerender account, obtain a token, and supply it in your application’s settings.json according to the Galaxy SEO package like this:

{
"PrerenderIO": {
"token": "yourtoken"
"serviceUrl": "https://service.prerender.io"
}
}

Note that because the default setting in the prerender npm module uses http for serviceUrl, we recommend you enforce https by supplying the serviceUrl as above.

That said, we wouldn’t be surprised if Prerender eventually switches everybody over to Chrome, so if your app only works in PhantomJS we encourage you to contact the super responsive support folks at Prerender (support@prerender.io) to let them know.

We are pleased to bring these new abilities to your Galaxy apps, and hope the Chrome integration brings you many fast and fruitful renderings!


Galaxy’s Prerender service is upgrading to Chrome! was originally published in Meteor Blog on Medium, where people are continuing the conversation by highlighting and responding to this story.

Meteor allow/deny vulnerability disclosure

$
0
0

A security bug in a common Meteor configuration which requires your attention

All Meteor developers should be aware of a recently discovered security vulnerability. Please read this disclosure for full details.

The vulnerability has already been fixed in Meteor and developers should see the Resolution section below for a meteor update command which patches existing applications.

In short, we recommend all developers update and deploy, however applications using the attachSchema method from aldeed:collection2 (or a similar method from another package) on the same collection where allow or deny rules are in place should pay particular attention.

Description

An exploitable security vulnerability has been discovered in Meteor through a downstream project’s bug bounty program which affects a commonly used application configuration, and could be used to access users’ private data or circumvent other protections an application may have in place.

By sending a specially crafted WebSocket payload, a malicious client can execute an update operation on individual MongoDB documents in violation of the collection’s allow and deny rules, when particular third-party packages are installed. When the malicious WebSocket frame is evaluated against the developer-configured rules, the exploit disables specific rules which would have blocked the operation, thus allowing the operation to be executed.

Impact

While a default Meteor configuration using Meteor’s core packages (for example, the accounts-* packages and allow-deny) is not automatically vulnerable, the exploit becomes possible when certain commonly-used third-party packages are also installed.

An application may be affected if it utilizes a MongoDB collection’s Mongo.Collection#allow or Mongo.Collection#deny methods to define collection-level rules and also uses any third-party packages to enforce a schema on the same collection. This consideration applies whether the application uses <CollectionName>.allow({...}) or <CollectionName>.deny({...}) directly, or the third-party packages manage the collection’s allow or deny rules on its behalf. Furthermore, Meteor.Collection is a (deprecated) alias for Mongo.Collection and is therefore subject to identical considerations.

Only Mongo update operations for documents which a user was allowed to update are affected. In the case where an update is allowed, this exploit may permit updates to unexpected parts of that document. This nuance becomes particularly relevant if an application has top-level properties which dictate a user’s permission level, such as an isAdmin (or similar) field.

Other protected operations such as insert, remove, or fetch are not affected.

If an application does not use any Mongo.Collection#allow methods directly or indirectly, we have no evidence of exploitability. Additionally, if a collection explicitly denies all updates with <CollectionName>.deny, then it will not be vulnerable.

If an application includes one of the following third-party packages, combined with allow rules without explicit deny rules (as outlined above), it may become vulnerable. The packages themselves are not to blame, though their presence may enable the exploit. These particular packages were chosen according to their popularity, not for any special role or fault in the exploit. Other packages which provide similar functionality should also be regarded with caution:

  • aldeed:collection2 or aldeed:collection2-core (or any other package which may be used for schema validation and enforcement): While these packages are functioning as designed, in some configurations they remove certain update parameters, which can change the behavior of the update. A collection which has not had a schema attached to it (for example, using <CollectionName>.attachSchema) should not be vulnerable.
  • ongoworks:security: Versions of this package after 2.0 no longer create allow and deny rules automatically, which means the exploit should not work, though appending allowInClientCode() to a normal permission chain may result in the addition of vulnerable allow and deny rules.
  • alanning:roles: This package stores permission information as a top-level roles property on the user document, which, if exploited properly, could be modified.

Resolution

The vulnerability has been fixed with the release of version 1.0.9 of the allow-deny Meteor package.

Regardless of whether you believe your application is affected, we highly recommend any application update to allow-deny@1.0.9.

After updating and deploying the fix, applications which match the criteria for being affected should audit sensitive Mongo documents to ensure no user permissions have been maliciously elevated and no sensitive fields have been modified.

Meteor 1.4 or later

The command to update the allow-deny package and patch the vulnerability is:

meteor update allow-deny

After running this command, please verify that allow-deny@1.0.9 was installed, either by examining the output of the command or looking at your .meteor/versions file.

Prior to Meteor 1.4

Any application running less than Meteor 1.4 should update to at least Meteor 1.4.x and apply this update using the above instructions. Meteor versions prior to 1.4 utilize Node.js 0.10.x, which is no longer receiving security updates from the Node Foundation and might already be susceptible to security vulnerabilities unrelated to this disclosure.

Running an unmaintained Node.js version is not recommended!

Credit

Meteor fully believes in ethical disclosure of vulnerabilities by security researchers who notify us with details and provide us time to address and fix the issues before public disclosure.

Credit for the discovery of this vulnerability goes to Sam Sun who reported the bug in Meteor as part of the LegalRobot bug bounty program they operate through HackerOne.


Meteor allow/deny vulnerability disclosure was originally published in Meteor Blog on Medium, where people are continuing the conversation by highlighting and responding to this story.

Know your Node.js

$
0
0

Precisely pinning Node.js versions helps Meteor developers.

In the course of writing Node.js applications for the server, developers have a number of options for installing Node.js in their development environments: ZIP-files, tarballs, platform-specific .pkg or .msi installers, package managers such as apt-get, yum, Homebrew and Chocolatey, as well as command-line tools like nvm and n. Each of these tools provides a slightly different way to install and run node from the command line.

Meteor itself contributes to this list of tools, since the Meteor distribution comes with its own copy of the node binary, conveniently precompiled for your platform (as long as you’re using Linux, Mac, or Windows). We’ve been bundling Node.js in this way ever since Node.js 0.4.0 shipped with the first version of Meteor (then called Skybreak) in 2011.

The best argument for bundling Node.js with Meteor back then was simply that it wasn’t safe to assume node was in most developers’ toolboxes five years ago. However, as time has passed, and hundreds and hundreds of versions of Node.js have been released, Meteor has continued to ship a carefully chosen version of Node.js which operates independently from any version that might be installed on the developer’s system.

With Node 8 on the cusp of long-term support (LTS) status, Meteor’s decision to bundle a specific version of Node.js makes more sense now than ever. This post explores some of the key benefits of that bundling.

Ease of setup

Meteor is mostly zero-configuration, and we think the installation should be too. The quick start aims to get developers up and running without regard to additional dependencies, or even understanding what they are.

This means that once the installation is done, a fully-functional Node.js binary and interactive REPL (read-eval-print-loop) are available via meteor node. In fact, you could skip installing Node.js globally in any of the aforementioned ways, and instead use the Meteor-bundled Node.js for all your needs:

meteor node -e 'console.log("I am Node.js %s!", process.version);'

Plus, it’s the exact same version Meteor is tested with!

The development bundle

The node binary that comes with Meteor is really just a small part of a larger set of files we call the “dev bundle,” which also includes precompiled mongo and mongod binaries for your platform, preinstalled node_modules used by the command-line tool, V8 headers, a standalone python.exe binary on Windows (used by node-gyp), and various other platform-specific dependencies.

Whenever we release a new version of Meteor, we run a Jenkins job to build this bundle on each of our supported platforms using a script called generate-dev-bundle.sh. We then compress the entire bundle and upload it to Amazon S3, so that it can be downloaded as a single file, as quickly as possible, from anywhere in the world. Since everything in the dev bundle has already been compiled for the exact version of Node.js that Meteor will be using, no additional installation or compilation is necessary. The dev bundle just needs to be downloaded and extracted, and everything it contains is ready to use.

If you think about it, none of these benefits would make sense if Meteor developers were expected to supply their own arbitrary version of Node.js. The whole point of compiling binary programs and npm packages ahead of time is so that developers don’t have to waste time worrying about the details of that process, or waiting for it to finish.

With that said, if you’re ever curious what using a different version of Node.js (or Mongo, or anything else in the dev bundle) might be like, you can build your own dev bundle by following the instructions here, and running Meteor from a git checkout. Since we don’t test any single version of Meteor against multiple major versions of Node.js, your mileage may vary, but then again we are not your legal guardians, so we won’t stand in your way.

Reliability across teams

In any Meteor application directory, the meteor command always obeys the contents of the .meteor/release file, which makes it possible to maintain multiple applications simultaneously using different versions of Meteor, and thus different versions of Node.js.

Imagine if you had to swap out your globally-installed /usr/bin/node binary every time you switched to a different Meteor application. Chances are you wouldn’t bother, and any incompatibilities you encountered would either force you to update all of your Meteor apps to the same version, or worse—you would never update any of your apps because that would mean updating all of them at the same time, and reinstalling a new system-wide version of Node.js for them to use.

Even if you’re developing only one Meteor application, or you think you have time to juggle different Node.js versions, or your development philosophy can be summed up with the acronym “YOLO,” you should still be mindful of your fellow developers. Given the hundreds of versions of Node.js that have been released over the years, it’s not hard to imagine a scenario where each developer on your team sees something different when they type node --version in the terminal. By comparison, meteor node --version should always display exactly the same version for the same application.

While package.json files have long accommodated an engines configuration, intended to offer semver-style contraints on compatible Node.js versions, the engine-strict option was deprecated in npm 3. The strictness was only ever enforced by npm and still allowed running a project with a version of Node.js against which it was never tested. Shell-based solutions such as .nvmrc help enforce the strictness, but that requires installing Node.js using nvm, and then reading each project’s README.md (with your eyes, ugh) to find out what version you should put in your .nvmrc file.

Indeed, if you truly embrace the fact that you only live once, then you must also recognize that such details are not worth your precious time. With Meteor, that time is yours again.

Just the right amount of transpilation

The ECMAScript standard evolves each year thanks to a steady stream of TC39 proposals. When paired with quickly evolving engine support for those features, there are many (too many, perhaps!) considerations that need to be made with each upgrade to the underlying engine.

Mathias Bynens, a developer on V8 at Google recently tweeted:

And this is so very true! Code transformations which take place by platform tools enable developers to take advantage of new language features today, before their engine fully supports them. These transformations must be re-evaluated regularly and and removed when natively supported to get the most out of the native implementations.

While application developers are certainly more than capable of making these regular considerations themselves, many prefer a hands-off approach which relies on their platform making these decisions for them.

Outside of Meteor, tools like babel-preset-env can help automate Babel configuration based on the target environment of the compiled code, which promises sweet relief from painstaking reconfiguration. However, Meteor uses a handful of custom Babel plugins (most notably Reify), and we obsess over the exact order and configuration of our core set of plugins. These Meteor-specific considerations, plus the luxury of having only one Node version to worry about, make babel-preset-env less appealing for Meteor than it is for other projects.

Whether or not you care about any of that, you can rest assured you’re getting the same carefully curated, well-tested Babel configuration as every other Meteor developer, and know that it takes full advantage of the native features of Meteor’s exact Node.js version.

A more consistent experience over time

We’re pretty excited about the incredible server-side debugging experience in the upcoming Meteor 1.6, thanks to to the V8 Inspector Protocol exposed in Node.js 8. But who’s to say that developers are excited about (or want to think about) changing the way they initiate the debugger?

Meteor has offered the meteor debug command for server-side debugging since version 0.9.4. This helpful command automatically integrated (yup, with no additional installation necessary!) the previous debugger-tool monopoly offered through the awesome, though often frustrating, node-inspector tool.

By refitting some internal plumbing, unbeknownst to developers, the meteor debug command will continue to launch in the same way in Meteor 1.6 while providing the smooth integration of the new inspector protocol, directly in the Dev Tools of supported browsers.

Streamlined maintainability for the Meteor platform

The additional control over and trust around the version of Node.js in Meteor is helpful to its users, but it’s also invaluable to the the development and maintenance of the meteor tool itself.

Contributors and bug triagers rarely have to be concerned with an unbounded list of version possibilities since Meteor “x” just uses Node.js “y”, which is the same as the triager’s version and is the same version previously tested in the Meteor test suite. When triaging a reproduction, it’s incredibly easy to load the application a different environment and quickly recreate the problem.

Within Meteor code logic, there are very few cases where version-based exceptions live on. When a new Node.js API behaves differently, the code can be confidently replaced with a new implementation without worrying about implementing process.version conditionals (et. al) to maintain backward compatibility.

Incredible detail is taken to make Meteor applications themselves backward compatible and it’s quite nice to be free of the additional considerations when building the tool!

Delivering important backports sooner

Developers might expect Node.js versions within a major “Long Term Support” (LTS) version to behave the same and be bug-free, however the change logs for minor and patch releases sometimes tell a different story. Mistakes happen, and there’s no need to cast blame.

As a recent example, when the Meteor test suite was crashing with a segmentation fault just before it exited (after it had successfully completed all its tests), it was clear something was wrong at a much deeper level. It turns out the issue cropped up in Node.js 4.6.2 due to a seemingly innocent, theoretically valuable, but accidentally misapplied V8 backport patch.

The proper fix might have taken weeks or even months to land in an official Node.js release (as of the writing of this article, more than a month later, it was still not officially released), though Meteor had the ability to float the patch in the next Meteor release, well-hidden behind the scenes of the meteor command. This also allows Meteor to provide feedback to upstream projects as their patches are vetted by our users outside of those project’s normal release schedules.

Pre-releases

The jump to the bleeding-edge Node.js 8 in Meteor 1.6 also provided more than one opportunity for this bundling to shine, since Meteor is afforded the luxury of working around any potentially breaking API changes which could crop up prior to Node.js 8 graduating to LTS status later this month without affecting Meteor developers downstream.

For one, what would have otherwise been a breaking change to meteor login due to an upstream issue in Node.js 8.1.0's readline built-in, ended up being an easy fix that didn’t need to consider other Node.js versions.

And more surgically, when an inadvertent regression occurred in a nested dependency of npm@5.4.0, it was relatively easy to fix by slipstreaming the patch into Meteor’s “dev bundle”, prior to the next release of npm. Even though it was resolved swiftly by their fantastic team, it wasn’t necessary to stop Meteor from moving forward with the next release.

Deployment which matches development

Everything we’ve discussed here is incredibly relevant during development, where Meteor aims to provide a reliable and reproducible experience for the lifetime of an application.

When deploying to production, Galaxy-hosted applications benefit automatically from metadata provided in each Meteor bundle, which promises Node.js version continuity through deployment. A Meteor 1.6 application using Node.js 8.6.0 during development will automatically use Node.js 8.6.0 when deployed with meteor deploy. Furthermore, if the Galaxy dashboard is used to roll back to a previous version, using a different Node.js, the version change will take place automatically.

Non-Galaxy deployment options may offer manual, freeform Node.js version selection. In those environments it’s recommended to use the nodeVersion field from the star.json file at the root of Meteor application bundles.

Conclusion

The Meteor project could not be more excited to ship the upcoming 1.6 version with the latest Node.js LTS release, and we’re thankful to be liberated from environmental concerns which could exist if fully de-coupled from specific Node.js versions.

While a future Meteor might roam freely from the Node.js binary itself, there are certainly some clear reasons to stay close to the Nodes we know best.


Know your Node.js was originally published in Meteor Blog on Medium, where people are continuing the conversation by highlighting and responding to this story.
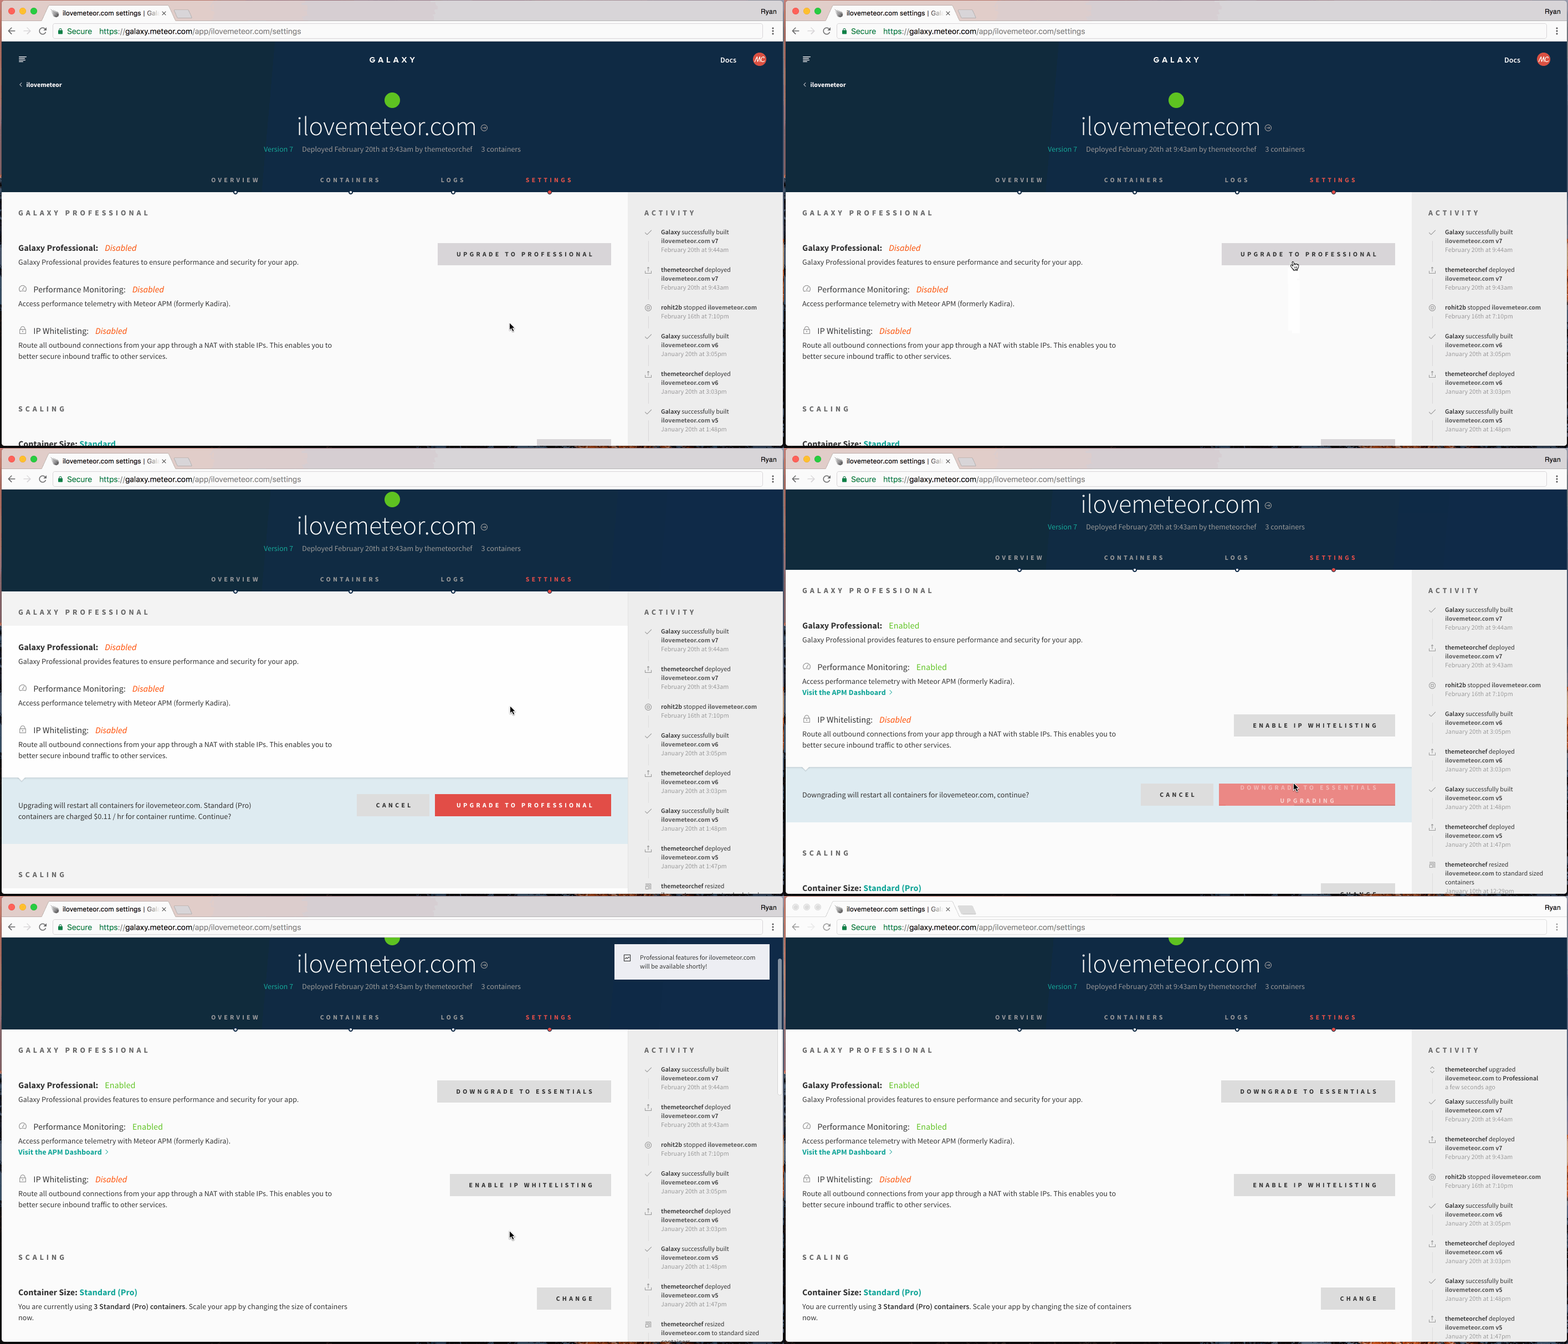
Real-World Unit Tests with Meteor and Jest

$
0
0

This is a guest post by Robert Dickert, Developer at OK GROW!

Unit tests are my favorite tests. They can run in milliseconds, and they make me write better code. But they can also be pretty challenging to set up. Meteor can also present some unique challenges to testing. When we were testing with Mocha, I happily followed a pattern developed by Pete Corey using testdouble.js to stub out Meteor (I will use the terms “mock” and “stub” interchangeably here, but there are differences). This is a great approach, and it also illustrates a couple of key points that many people new to unit testing don’t always realize:

Unit tests should be fast. Unit tests for a small project should complete in tens of milliseconds or faster (with exceptions for some data-intensive functions). This is important because unit tests are designed to be run a lot (I often run them in watch mode to guide my work in real-time). That by definition means that you can’t use any network, database, or file system resources. And generally, that will guide you to the correct way to unit test anyway, because your aren’t isolating units of code if they access outside resources.

Don’t test the framework. It’s not your job to see if there’s a bug in Meteor; they’ve got it covered. Your job is to make sure Meteor gets called correctly, and that when it provides results to your code, your code handles them as expected. I would go as far as to say that even using minimongo in unit tests is generally not a good idea even though it’s fast enough.

Stubbing out Meteor used to be impossible. I know — I was involved in the Velocity testing initiative back in the day. As an example, at one point we tried to port the automocking functionality from Jest, but Meteor’s dependencies were not easy to walk, and loading individual components without Meteor’s global objects was very hard. With the move to Meteor 1.3, though, we could start to use standard JS modules with import, and that opened the doors to using standard JavaScript tools. Hurray!

MOVING TO JEST

Just having “naked” Mocha tests without Velocity or other wrappers was a huge win for speed and the ability to make use of the broader JavaScript ecosystem. But earlier this year, OK GROW! started experimenting with Jest. With our heavy use of React and React Native, it was becoming an obvious choice community-wise, and a couple of our developers coming to JavaScript from Ruby also were experiencing a lot of frustration with the fragmentation and excessive configuration that Mocha was requiring. I had misgivings, and I was afraid dealing with Meteor would be more awkward, but it turns out that Jest has powerful ways to deal with even Meteor’s meteor/{package} imports.

OUR CODE UNDER TEST: ADMINS MAKING SIMULATED TRADES FOR USERS

Instead of testing a simplistic (a, b) => a + b function, let's try to imagine something more real-world. Say you have a stock trading platform, providing both real and simulated trades to its users. The trade simulator is simplified and doesn't handle certain things, so we have a function to allow an administrator to make a simulated trade on behalf of a user. For example, all owners of Whole Foods had to be converted to Amazon stock when Amazon acquired them, so the admin would need to sell WFM and buy AMZN on a certain date at certain prices. Here's the code for the file placeTradeForUser.js:

// This function allows admins to place arbitrary trades for a
// user or group of users, useful for correcting problems or

// dealing with company acquisitions where one stock
// is converted into another for all owners.
import { Meteor } from 'meteor/meteor';
import { placeOrder } from './tradeSimulator';
export default placeTradeForUser = async orderSpec => {
  const user = Meteor.users.findOne({
username: orderSpec.username
});
  // Throw an error if the user is not a simulated user
// (we don't want to ever issue trades to a live account!)
if (user.tradingAccount.provider !== 'simulator') {
throw new Error(
`user ${user.username} is not a simulated account.`
);
}
  const transactionId = await placeOrder(orderSpec);
return transactionId;
};

Placing trades for someone else is useful on a simulator, but you wouldn’t want to have any chance of triggering trades on the live platform! What we want to test is that whether it will correctly throw that error (you might want other protections as well 😃, but we’ll stick with a simplified example).

THE TEST CODE

Here’s the content of placeTradeForUser.test.js. Note the name will put it right next to the file under test in your directory structure. This makes it easy for you to work with both files at once.

jest.mock('meteor/meteor');
import { __setUsersQueryResult } from 'meteor/meteor';
jest.mock('./tradeSimulator', () => ({
placeOrder: jest.fn()
}));
import { placeOrder } from './tradeSimulator';
import placeTradeForUser from './placeTradeForUser';
describe('placeTradeForUser()', () => {
test('allow trades on provider `simulator`', async () => {
__setUsersQueryResult({
username: 'testuser',
tradingAccount: {
provider: 'simulator',
},
});
await placeTradeForUser({});
expect(tradeSimulator.placeOrder).toBeCalled();
});
test('disallow trades on provider `fidelity`', async () => {
__setUsersQueryResult({
username: 'testuser',
tradingAccount: {
provider: 'fidelity',
},
});
const result = placeTradeForUser({});
await expect(result).rejects.toEqual(
new Error('user testuser is not a simulated account.')
);
});
});

There’s a lot to look at here, but first notice the two test statements. In the first, we expect(tradeSimulator.placeOrder).toBeCalled(). We don't look at the result; we're just making sure the other module is called normally if the account is simulated. The second test uses a live trading account, and although the test is a little harder to read, you can gather that it should return a rejected promise with an error message (it's a rejected promise because placeTradeForUser() is an async function – otherwise you could use the nicer expect(result).toThrow(new Error(...))). A better way to expect rejected promises is on the way.

So great, we have a useful test! But the code we are testing accesses placeOrder(), an outside function which comes via a named import, and more importantly, it makes a database query via Meteor.user. Meteor imports will cause Jest to throw an error because Jest expects the import path to point to an npm module that isn't there. Most of this code is standard Jest mocking (see the docs here and here), but two things deserve mention.

MOCKING NAMED IMPORTS

Since we’re at the front of the charge toward modern JavaScript, we’ll sometimes run into things that are still designed around how require works. If we were using a default export (e.g., import placeOrder from './placeOrder';), we could substitute our own implementation, but we are using a named import (import { placeOrder } from './tradeSimulator' – note the { braces }), and ES6 module imports will throw an error if mutated (nor can we move it to an arbitrary object, as Jest won't pick it up and stub it in for us). Luckily, jest.mock() can handle this. If we pass the path of the file to mock and a function returning the mocked exports, we can import { placeOrder } normally (hat tip to Jesse Rosenberger for showing me this).

MOCKING METEOR/METEOR

Everything up to this point is just standard Jest code, but Meteor still imports Meteor packages via the meteor/packageName convention, which Meteor knows how to process, but which Jest can't. (Note: this part will hopefully go out of date with a future version of Meteor as Meteor works its way to being 100% npm-based.) Luckily, Jest provides us with the tools we need (hat tip to StackExchange user chmanie). In this case, in the real app we'd be accessing a database, and we need the value it returns – and control of that value – to do our test.

First we need to tell Jest where to find our mocks, and luckily you can do that in your jest.config.js file or package.json. We’ll do this with a jest.config.js which looks like:

module.exports = {
moduleNameMapper: {
'^meteor/(.*)': '<rootDir>/.meteorMocks/index.js',
},
}

Then we can put our mock code in .meteorMocks/index.js:

let usersQueryResult = [];
export function __setUsersQueryResult(result) {
usersQueryResult = result;
}
export const Meteor = {
users: {
findOne: jest.fn().mockImplementation(() => usersQueryResult),
find: jest.fn().mockImplementation(() => ({
fetch: jest.fn().mockReturnValue(usersQueryResult),
count: jest.fn(),
})),
},
};
export const Mongo = {
Collection: jest.fn().mockImplementation(() => ({
_ensureIndex: (jest.fn()),
})),
};

This gives us a closure that allows us to set an arbitrary result usersQueryResult to be returned by our mocked function as well as the private __setUsersQueryResult() that our tests can import to change that value. In addition, it implements some of the structure of the Meteor object. Note that we don't have to implement everything, only things that are used by our function under test. We could omit find, fetch or count in this example, but it can also be used by other tests that may need those things.

IMPORTING OTHER METEOR PACKAGES

The Mongo mock object in the above code is also not needed in our example, but it will successfully stub out a collection definition if needed, including indexes., e.g. this file:

import { Meteor } from 'meteor/meteor';
import { Mongo } from 'meteor/mongo';
const Performance = new Mongo.Collection('performance');
Performance._ensureIndex({
userId: 'text',
});
export default Performance;

See how that worked? new Mongo.Collection() will return an object that has a function _ensureIndex, again allowing us to compile without errors.

That’s it. You are now ready to test anything, anywhere.

About the author: Robert Dickert is a developer at OK GROW!, a Meteor Prime Partner that builds software and provides training in JavaScript, React, and GraphQL. He has been active in the Meteor community since 2012. If you’re interested in learning more about JavaScript testing and its benefits, join us at Assert(js) Conf on February 22, 2018!


Real-World Unit Tests with Meteor and Jest was originally published in Meteor Blog on Medium, where people are continuing the conversation by highlighting and responding to this story.

Viewing all 160 articles
Browse latest View live